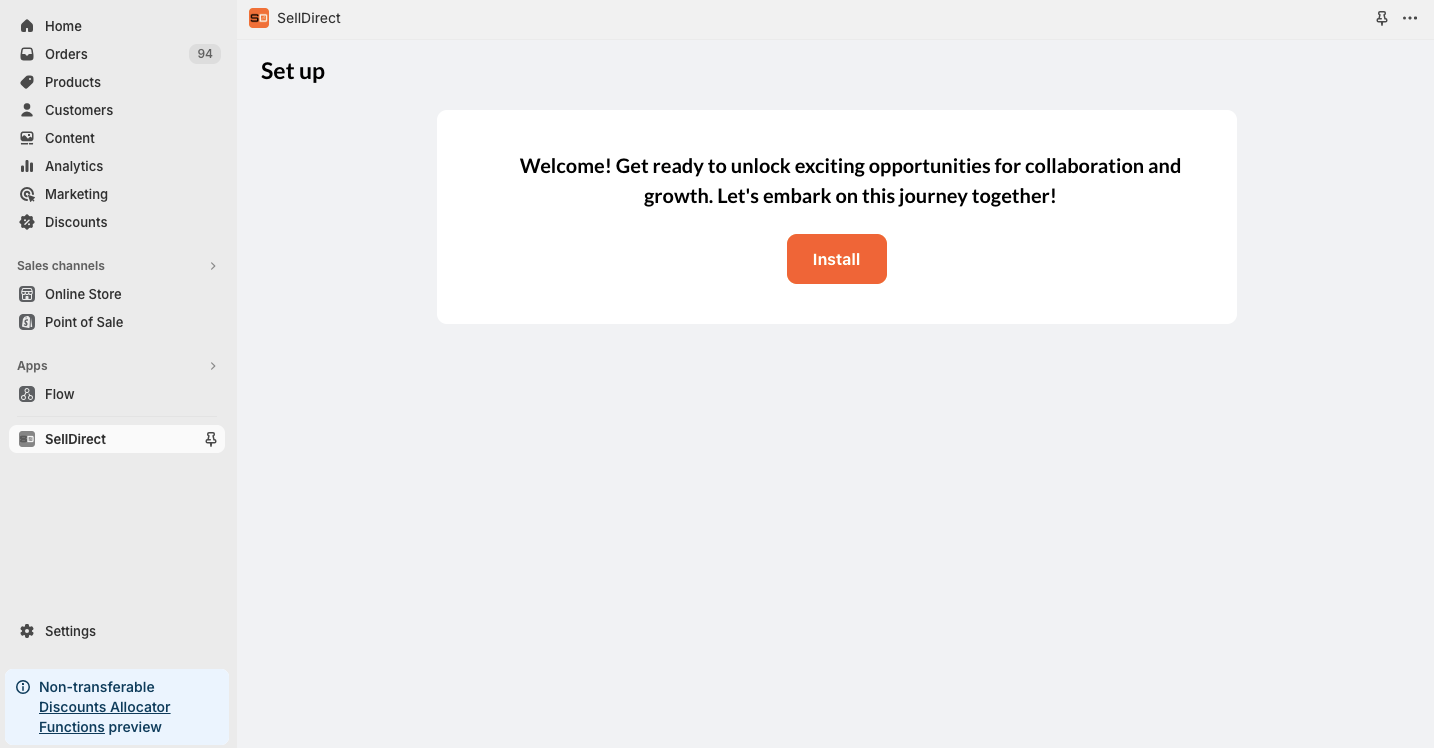
SellDirect
Precondition For Sell Direct
- Express checkout for the store needs to be disabled – Affiliate discounts and rewards redemption are applied on the cart page only.
- Checkout and custom account using mobile number needs to be disabled – Every order and customer are tracked using emails only.
- Multicurrency stores are not supported.
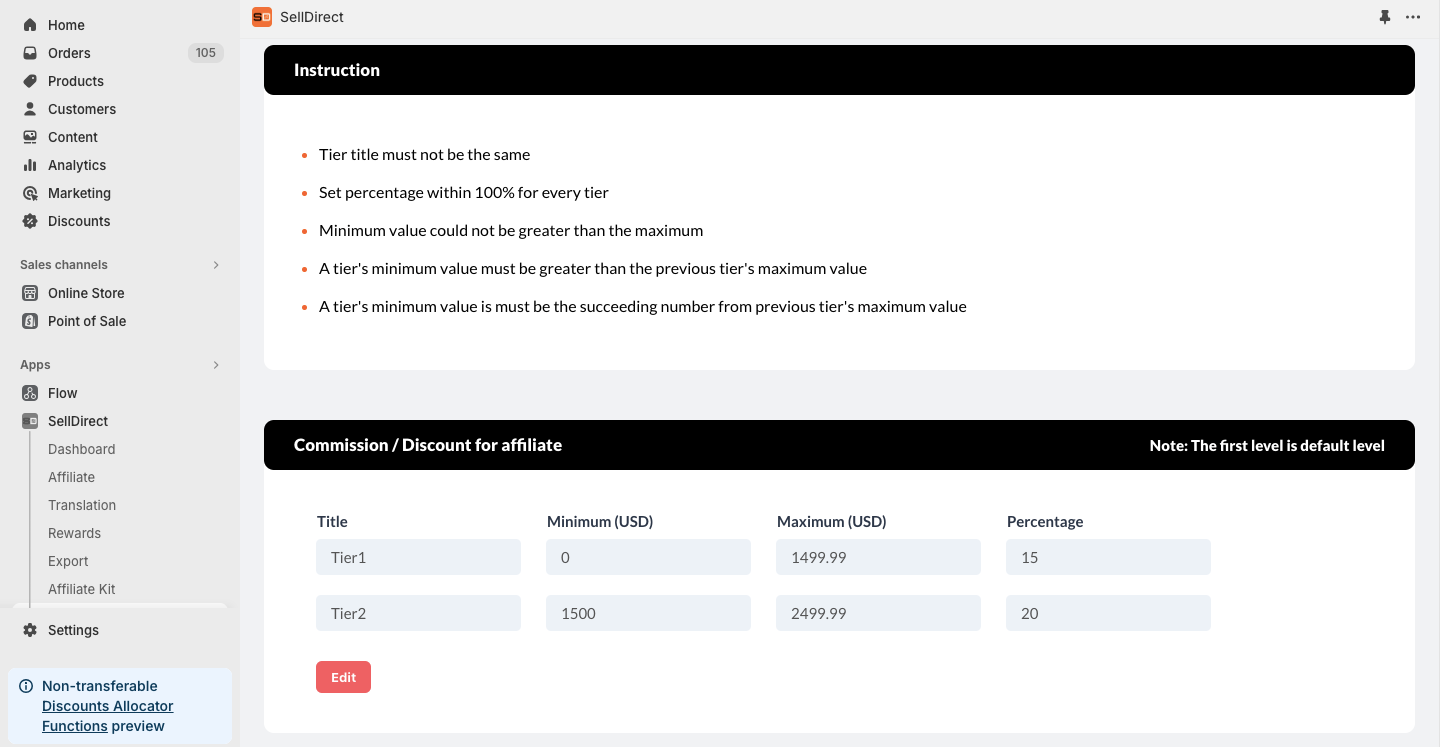
Tier Configuration
This tier configuration setup is used to configure the affiliate discount and commission. An affiliate discount is applied when an affiliate shops through the store for himself. This is an automatic discount. The level for the discount will be calculated at the beginning of the month based on the previous month’s sales of the affiliate.
Previous month’s sales – the sum of the order total of an affiliate for the previous month.
Discount percentage for the affiliate will be set based on the level’s price range in this configuration.
Conditions for the configuration:
- The first level will always start from price 0.
-
Each level should start from the next range of the
earlier level. There shouldn’t be any missing range
between the two levels.
For example: Level 1 starts from 0 $ and ends with 100.95 $. Level 2 should start from 100.96 $. - Once the discount is created, the discount level name is not editable, but ranges and discount percentages can be edited.

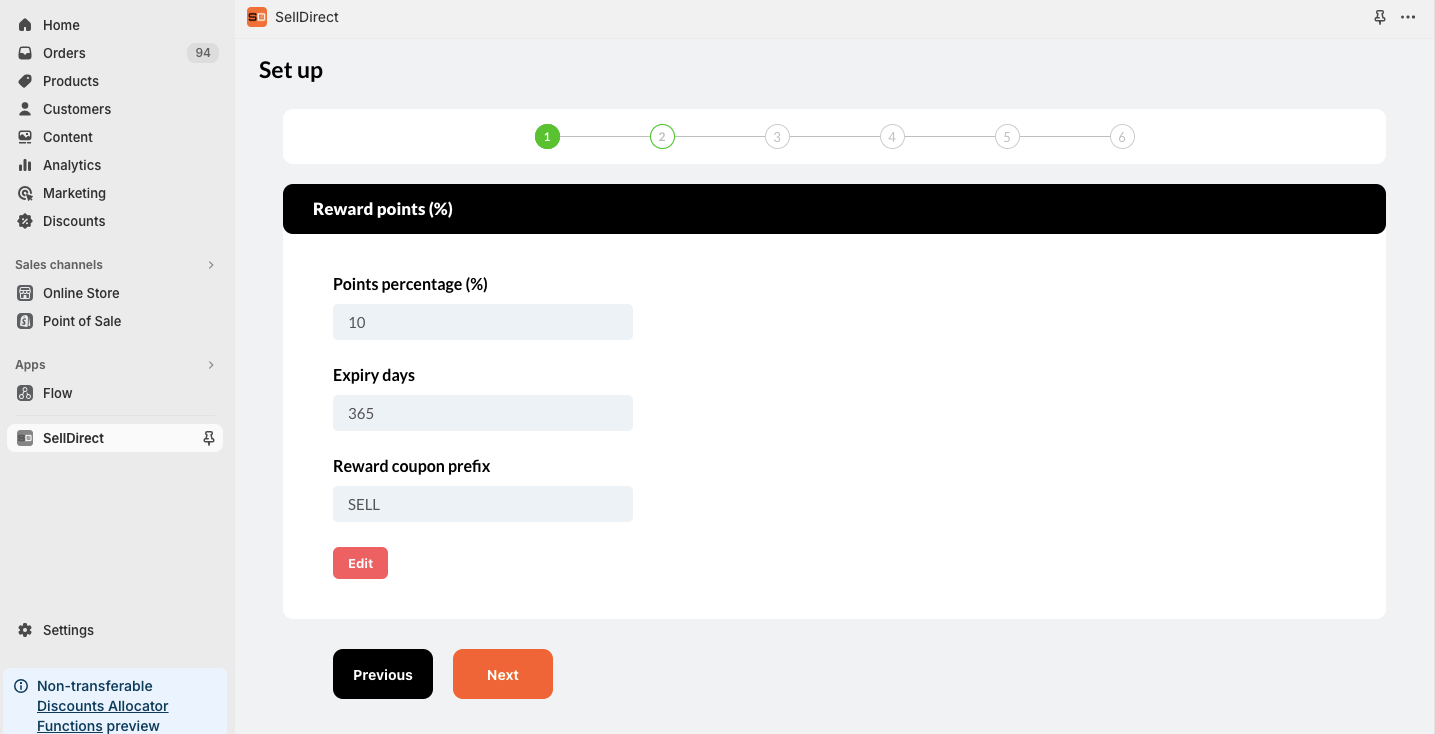
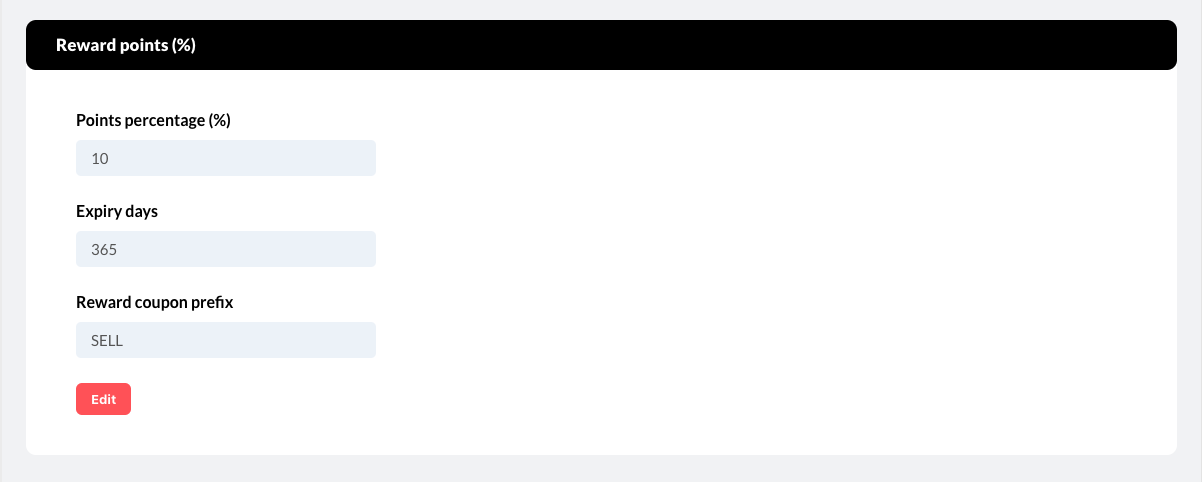
Rewards Configuration
This configuration sets a percentage for the rewards given to the customer on their orders. Rewards have an expiry date, which will also be configured in this step.
Reward coupon prefix is also configured here. This will be added as prefix for the redeemed coupons.
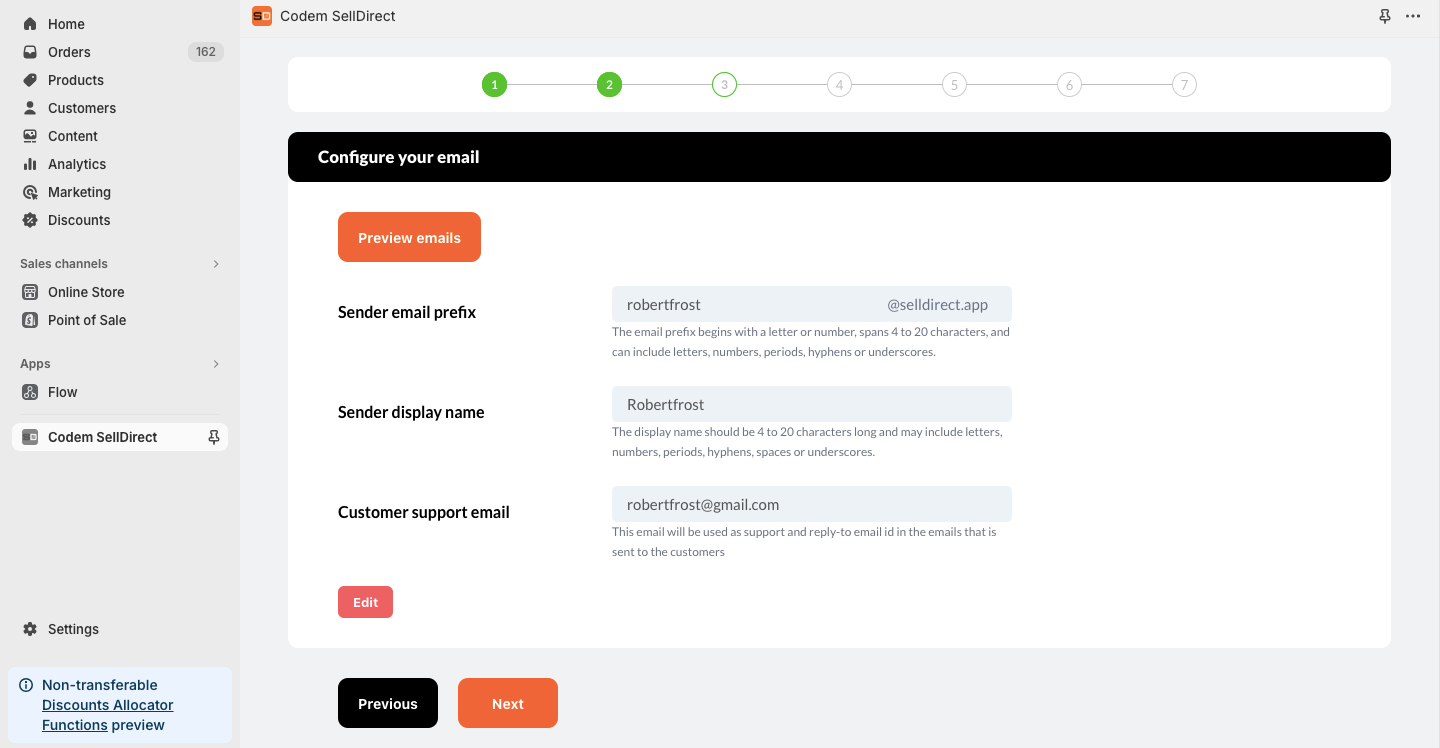
Sender Email configuration
Merchants can add the sender’s email text here. The domain name for the email will be our organization name only.
For example: no-reply@selldirect.app → Here, ‘no-reply’ can be editable by the Merchants.
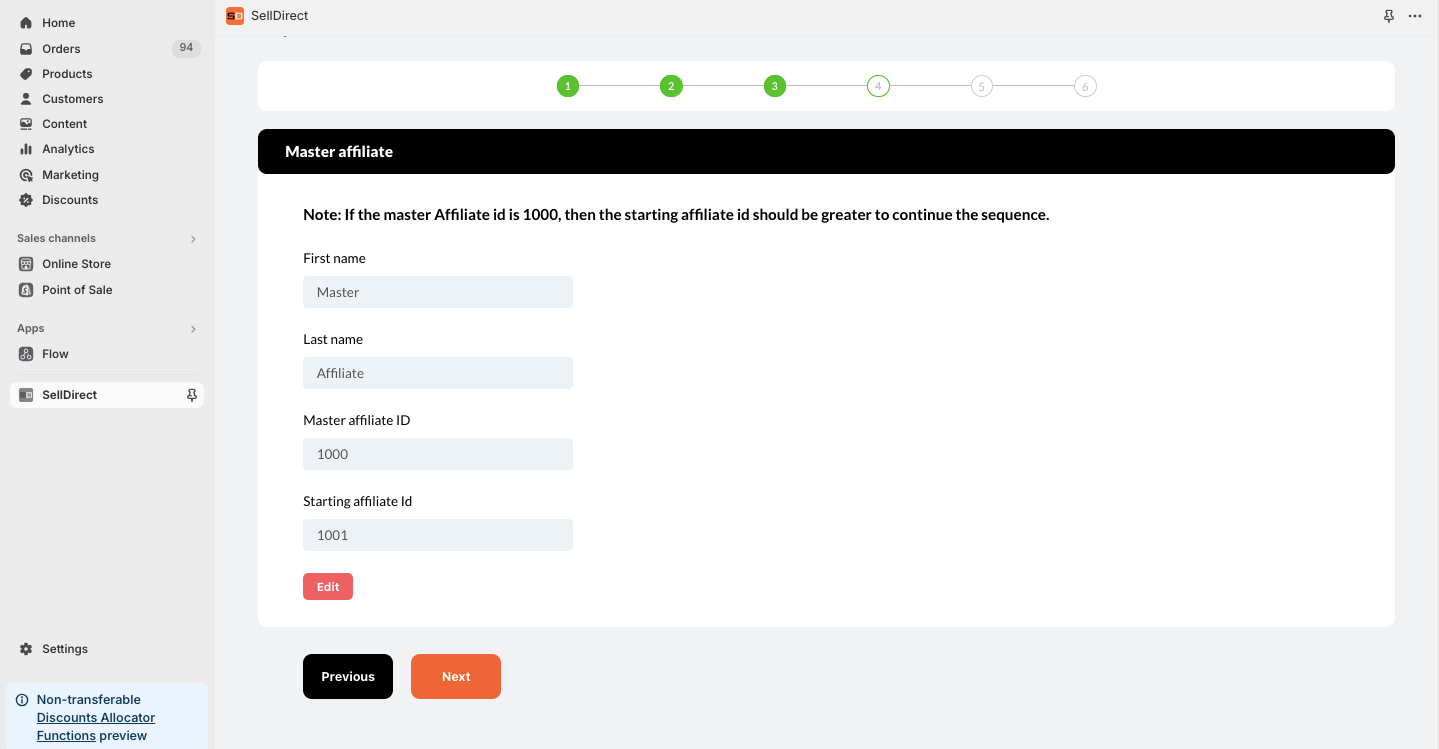
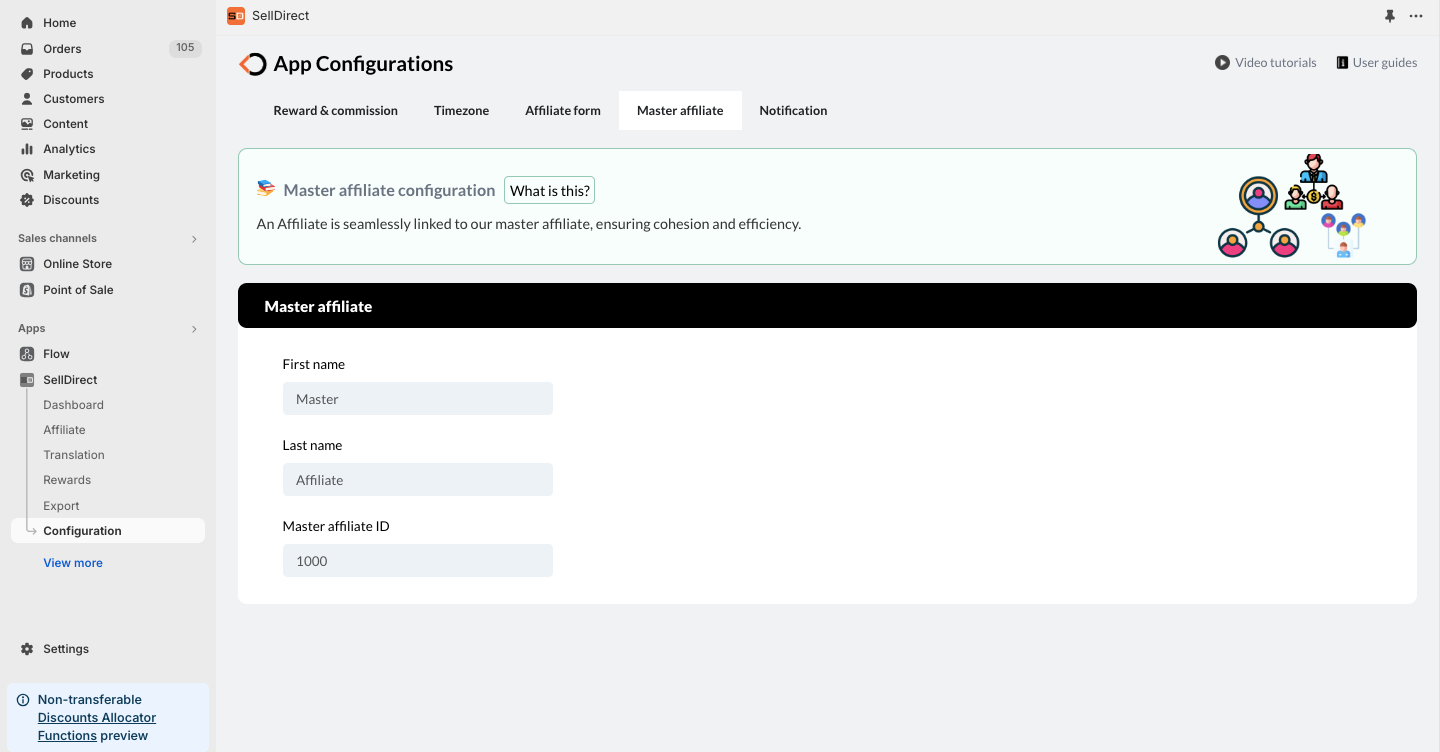
Master Affiliate configuration
This configuration is used to set up the master affiliate for the store. Affiliate ID should be a number. The first affiliate will be attached to the master affiliate.
Affiliate ID is a unique identifier for the affiliate, and it will be a number. It will auto increment based on the starting number in this configuration.
Conditions for the configuration:
- Since the Affiliate ID is auto incremented, master affiliate ID should not be greater than the starting affiliate ID.
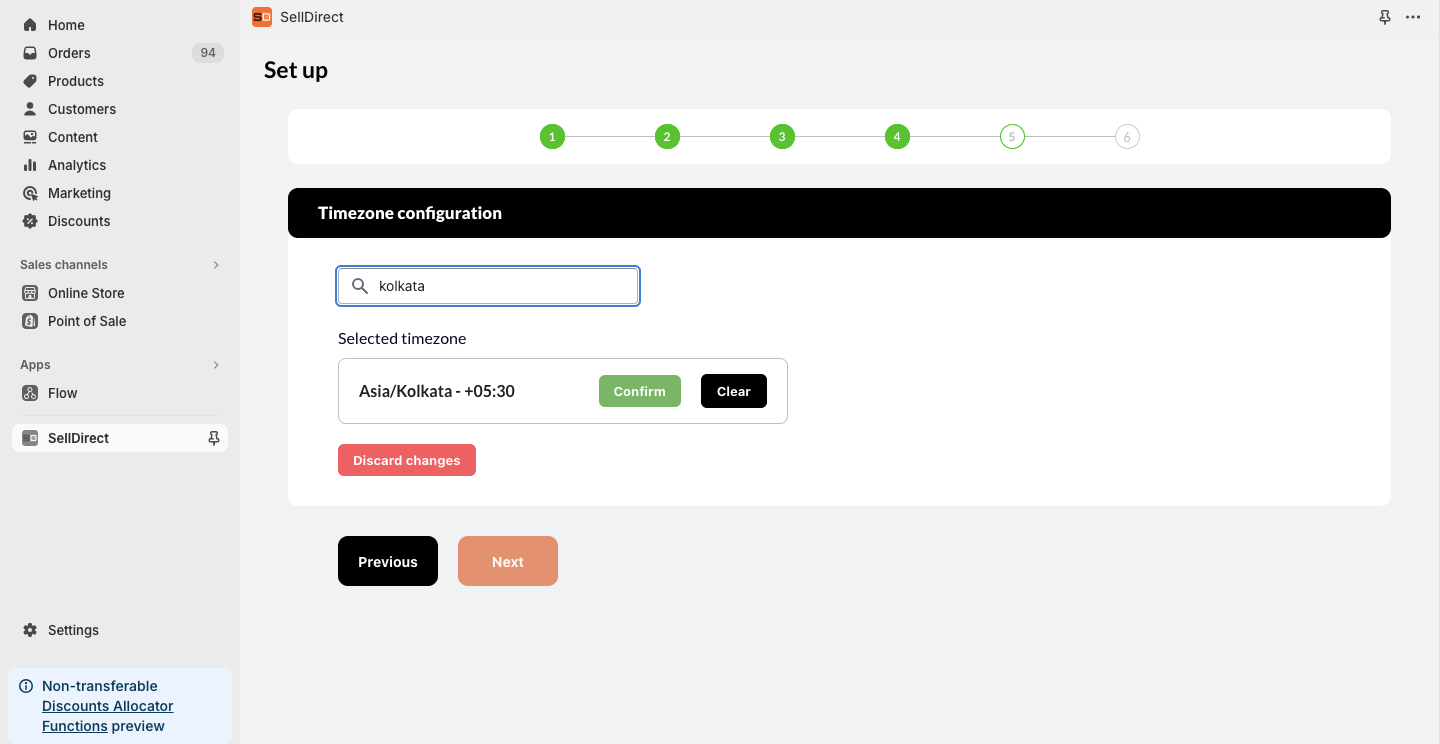
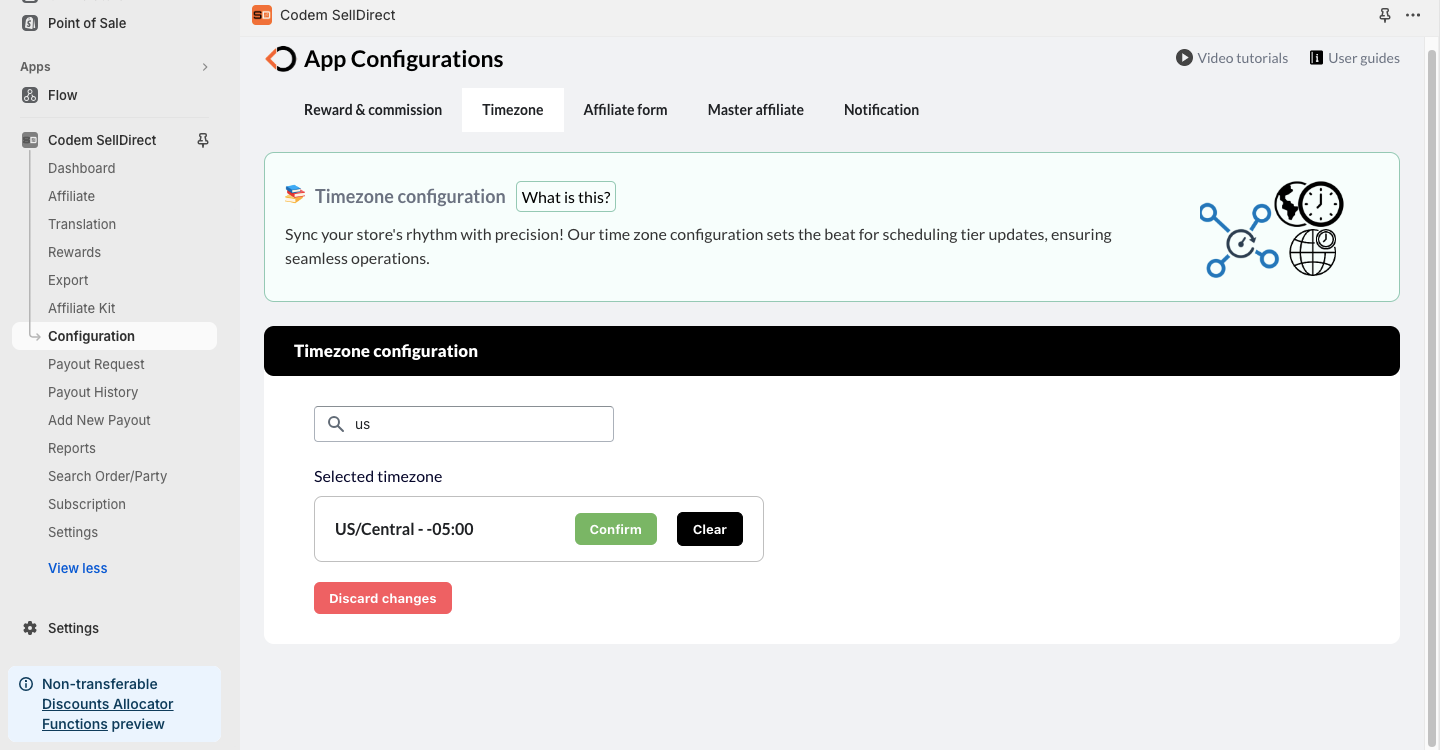
Time zone configuration
The Time Zone for the store is configured here. All Schedulers will run based on this time configuration.
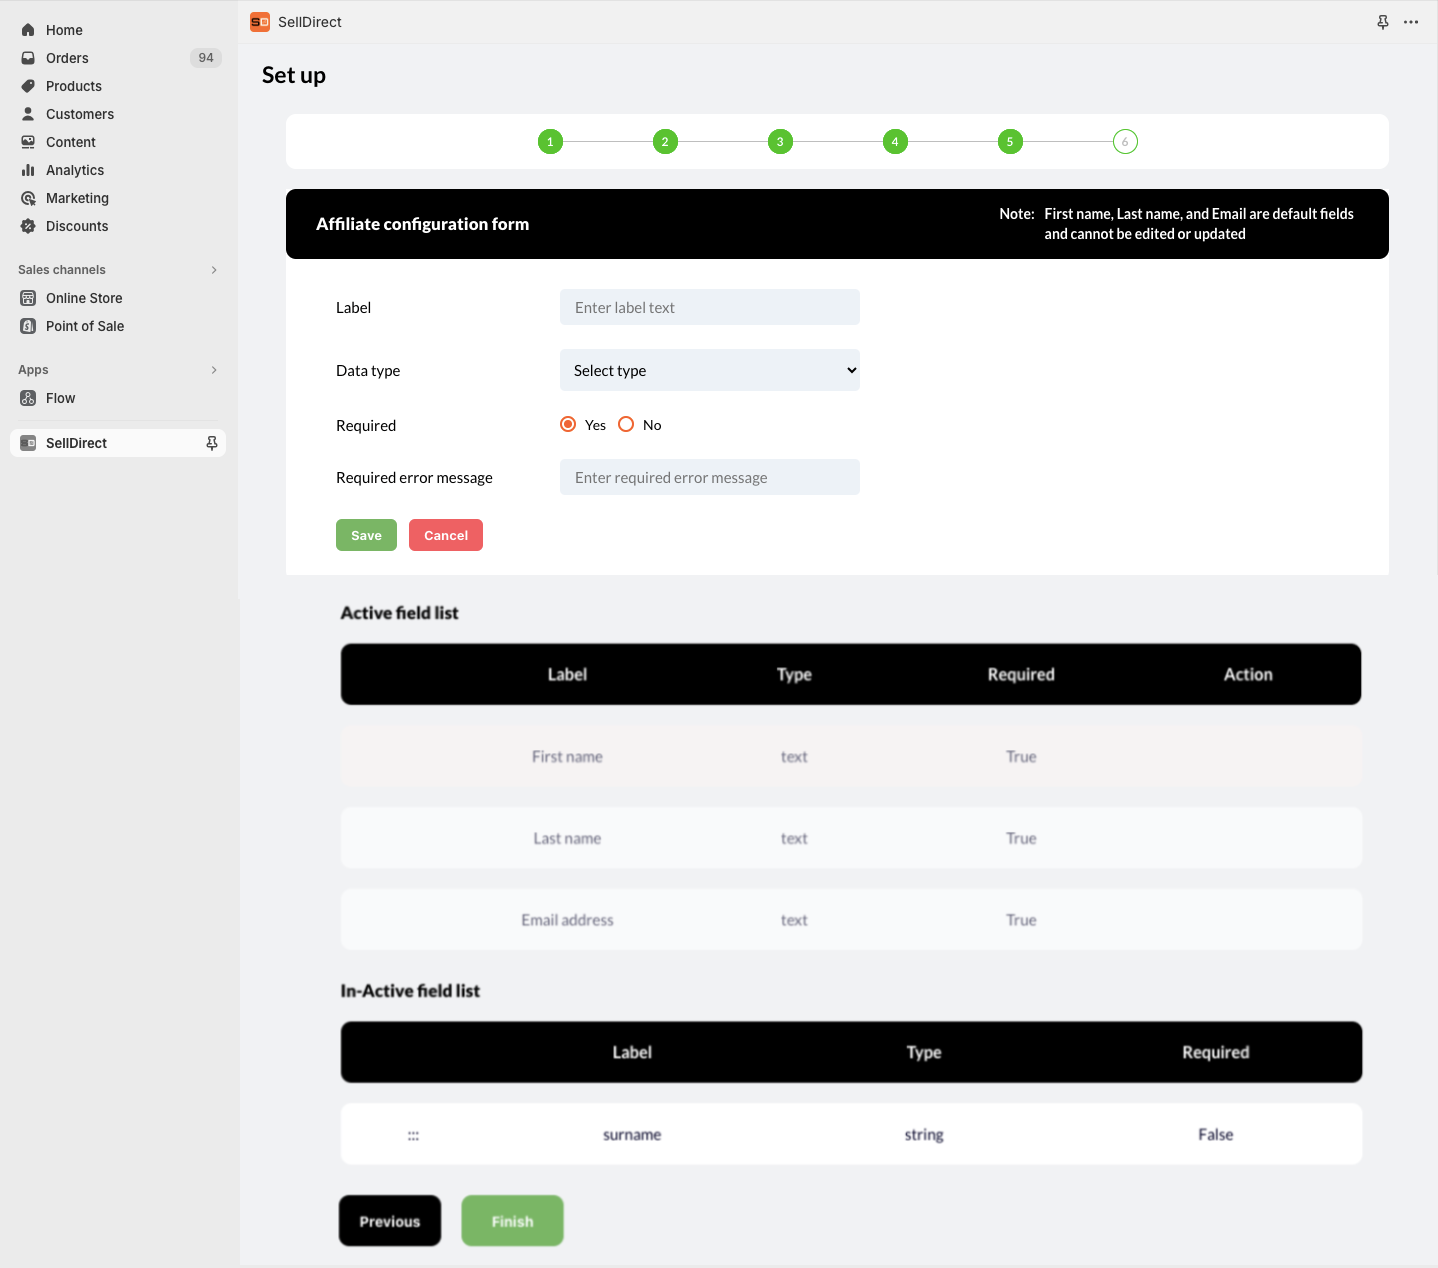
Affiliate form configuration
This configuration customizes the fields to become an affiliate form. There are some default fields in the form, which will be captured from Shopify. These default fields are not editable.
Default fields: First name, Last name, Email
Merchants can add and edit the fields and find the field’s data type here. The position of the field can also be changed.
Conditions for the configuration:
- Duplicate fields are not allowed.
- It is not possible to change the non-required field to a required one.
- Default fields are unable to create again.
- If the fields are mandatory, must provide the required error message.
Theme – Customization
- Find an Affiliate – This is to search for an affiliate.
- Become an Affiliate – This is for adding an affiliate form.
- Host – This is for using party URL to place party orders by customer.
- Party order form – To select parties and customers for placing party orders.
- Rewards redemption form – To generate coupons to claim the rewards.
Enable app blocks
- Affiliate form to ‘Become an Affiliate’ page.
- Search Affiliate to ‘Find an Affiliate’ page.
- Host block to ‘Host’ page.
- In Cart Page, add the Rewards Redemption form and Party order form.
- My Account Dashboard to ‘Customer account’ page.
Become an affiliate
- The “Become an affiliate” form will be displayed for register customer only.
- The “Become an Affiliate” form will not be displayed for guest customers or affiliates.
- A customer will be able to become an affiliate only if they are attached to another affiliate.
- “Search affiliate option” in Become an affiliate, enables customers to search for an affiliate using their first name, last name, and email address.
- Until any one of the affiliates becomes active, the customer can attach to a master affiliate using the master affiliate’s first and last name search.
Find an affiliate
- Customers can attach with an affiliate using first and last name and emails of the affiliate in “Find an affiliate” section.
Host Page
- After creating party, the host URL will be generated.
- Customers or guests can search using the host URL to display the host page block.
- If the party is closed, the host page block will display ” The Party is expired “. Otherwise, customers can join the party and they will redirect to the home page to shop. Party embedded banner will be displayed on the top.
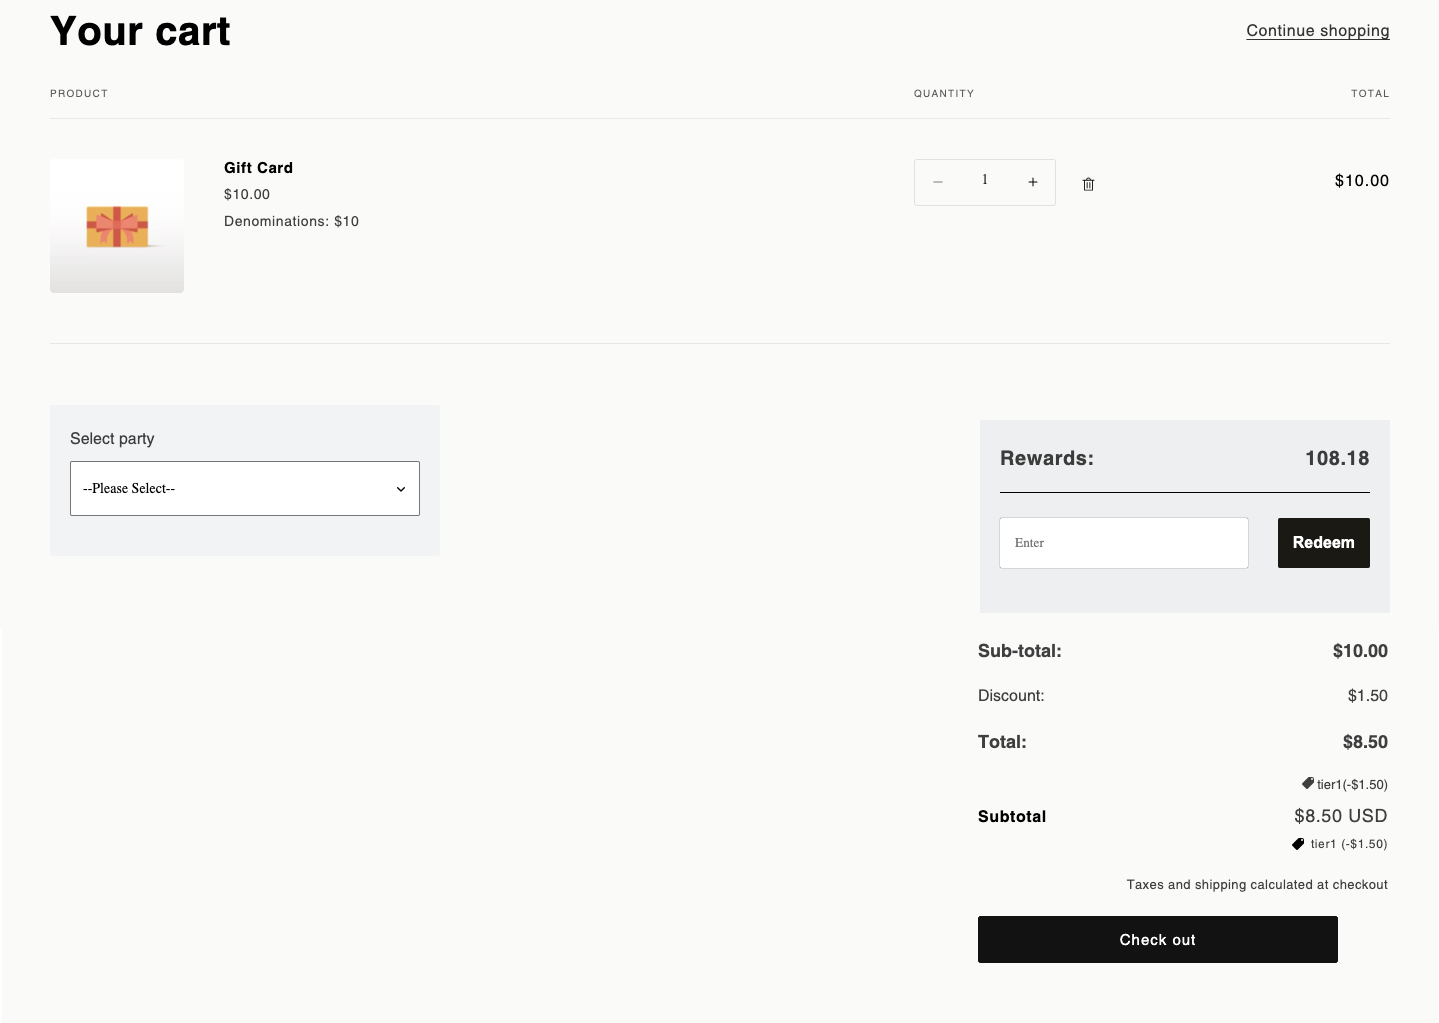
Redemption Form
- The redemption form block will be displayed on the cart page only.
- If the cart page is empty, the redemption form block will not be displayed.
- The form shows the rewards earned by the affiliate or customer.
- The affiliate or customer will be able to use these rewards to generate a coupon, which can be applied to the product total for redemption.
Party Form
- If the cart page is empty, the party form block will not be displayed and is only shown on the cart page.
- The party form block will be displayed if the affiliate has any active parties.
- In the party form, an affiliate can place an order for themselves, a customer or the host (other hosted parties).
- An affiliate can place an order for a customer only if the affiliate has any downline customers.
My Account Dashboard
- The “My Account” dashboard block will be displayed only for registered customers, as set in the theme customization page.
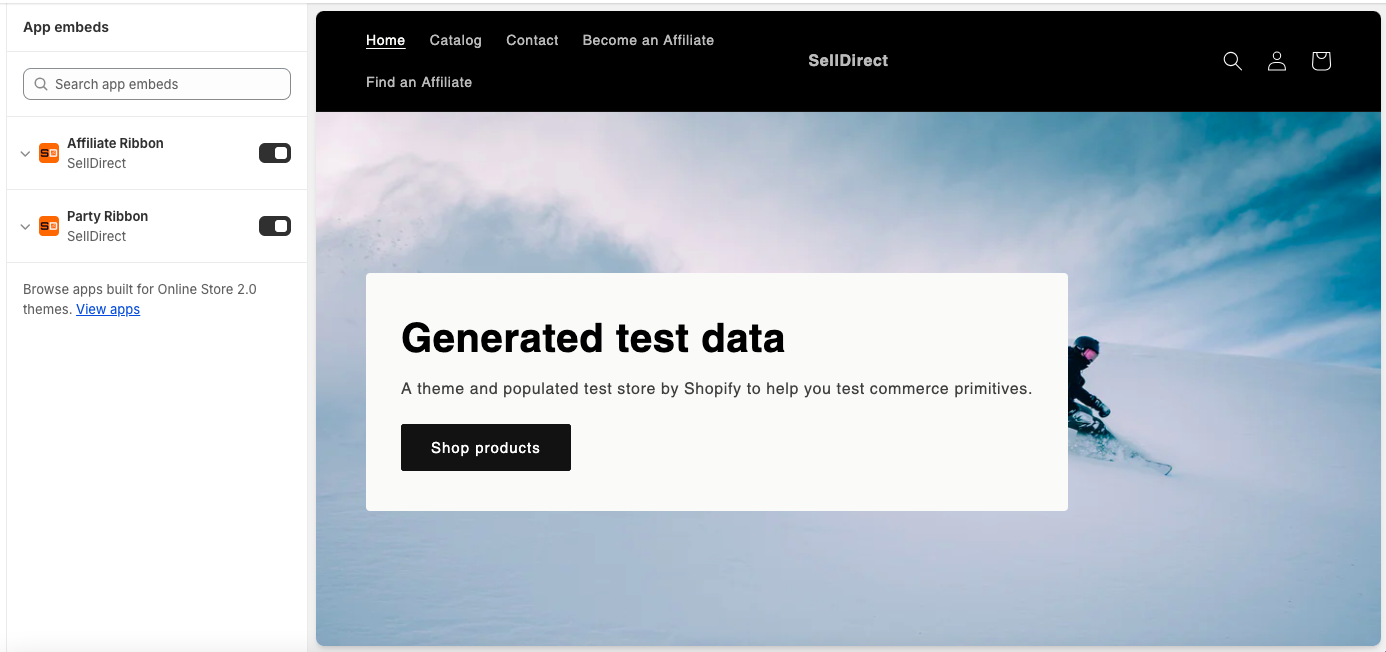
Enable app embed blocks
Merchant needs to enable app embed blocks from theme customization
- Affiliate Ribbon – For showing attached affiliates at the top.
- Party Ribbon – For showing party details at the top.
Affiliate Ribbon
- When a customer becomes an affiliate, an affiliate ribbon will be displayed, indicating which affiliate the customer is attached to, as found using the Become an Affiliate form
- The affiliate ribbon block will be displayed if the customer attaches to an affiliate using the Find an Affiliate form or the affiliate URL.
Party Ribbon
- When a customer or guest attaches to a party using host URL, the party ribbon block will be displayed
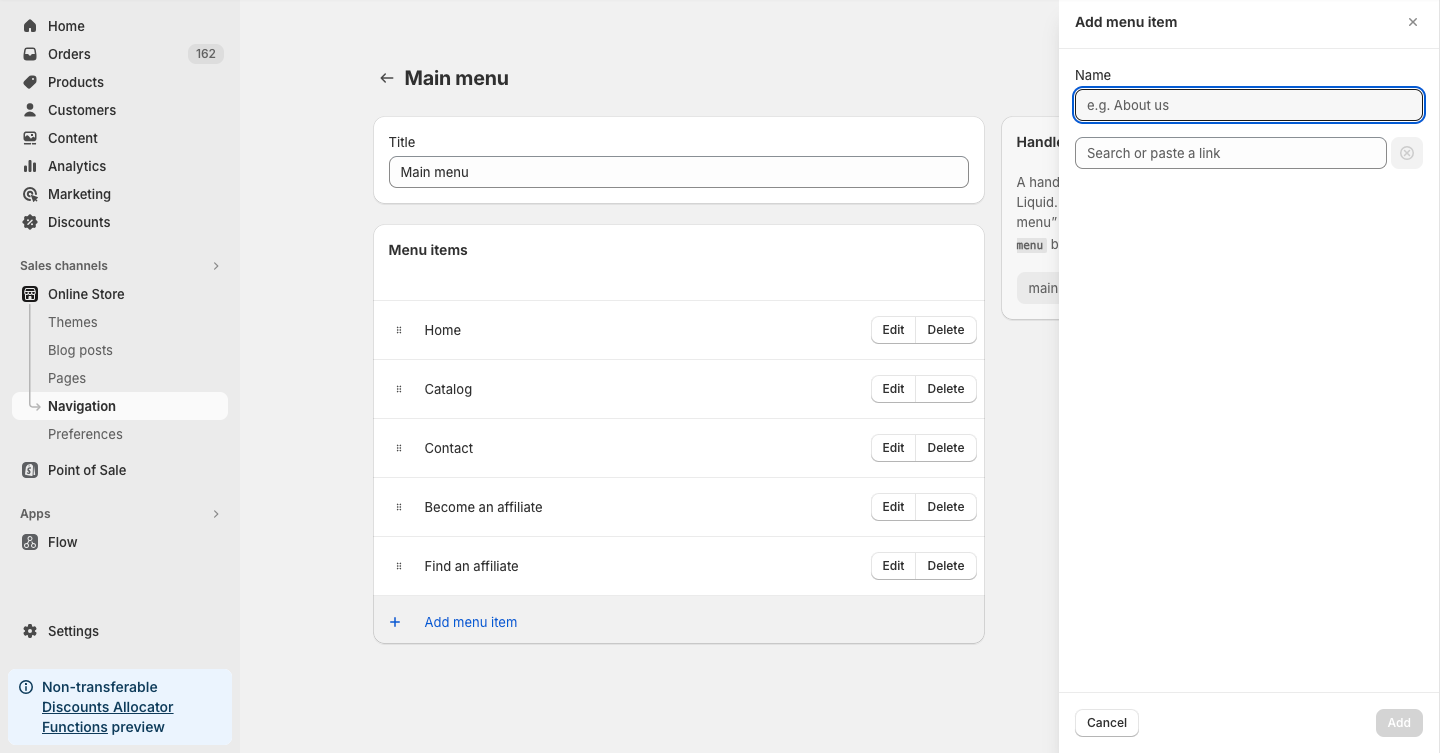
Add navigation on headers
If merchants want to show navigation for find and become an affiliate page for the customers, they can add navigation in their main menu from Shopify
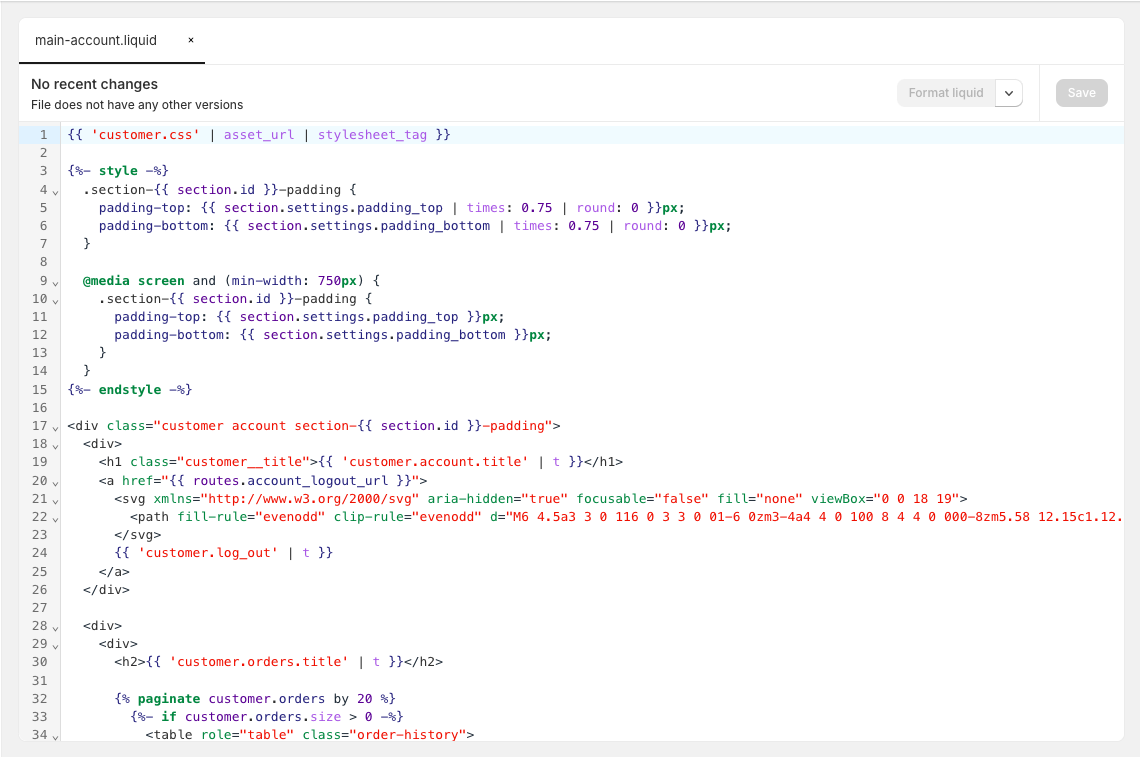
Remove default Shopify’s account dashboard code – OPTIONAL
If Merchants do not want to show the default Shopify’s account dashboard in the customer account page, they can remove the code from the theme’s liquid file for the account dashboard from their theme.
Refer to the screen shots here.
REFERENCE – DAWN theme. File names for the page can be different for each theme.
1. Affiliate/ Anonymous Customer / Loyal Customer
The referral model will be used which means there will be two user groups.
- Affiliate.
- Regular customers, Anonymous customers (Guest) will follow regular ecommerce flow.
Anonymous Customer
- Anonymous customer (Guest) users can land on the website, add the products to their cart, and place orders like regular ecommerce flow.
- These customers do not receive any discount.
Affiliate Registration

a. Become an Affiliate form
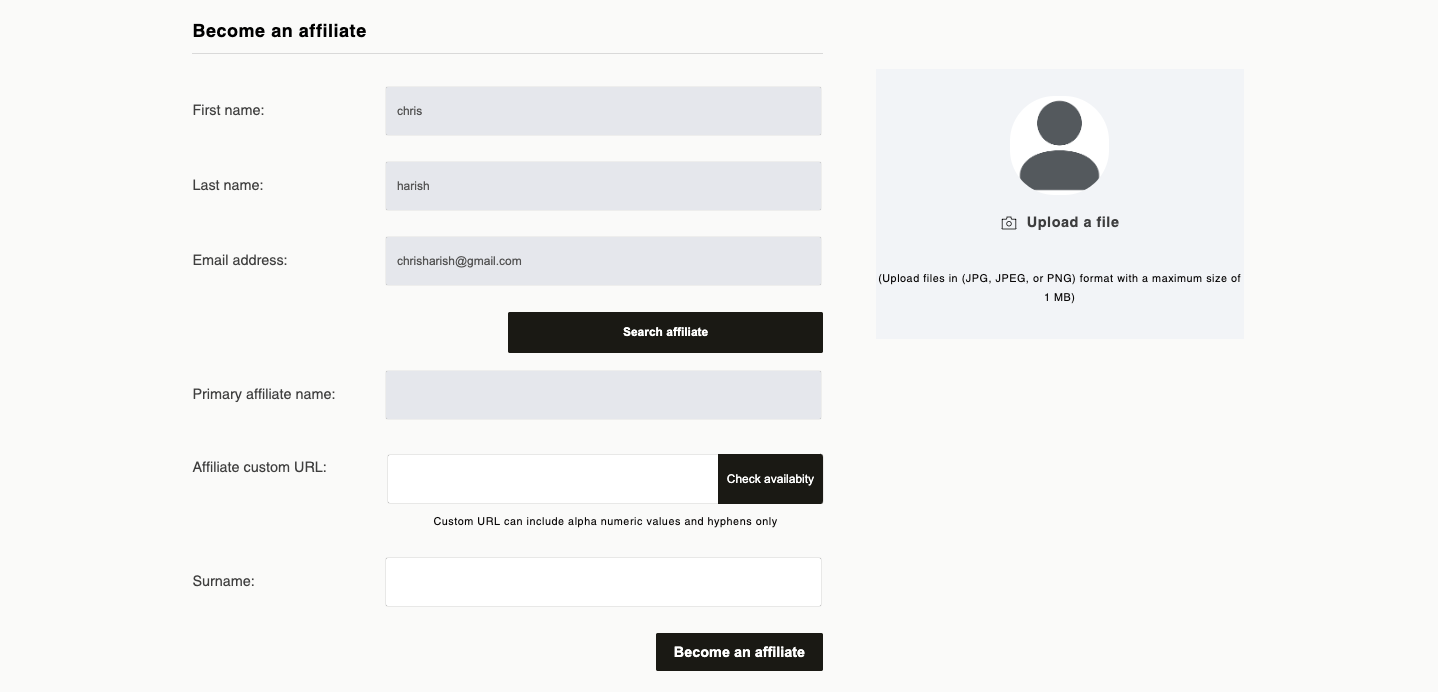
The following details are required on the affiliate registration form.
- Default Fields: First & Last Name, Email address, Profile picture, Primary affiliate name and Affiliate URL handle.
- Custom Fields: The fields other than default which are configured by admin using affiliate configuration form.
- Customers needs to select their primary or parent affiliate before submit the affiliate registration form.
- If there is no active affiliates, Master affiliate will be shown on their name search. otherwise, master affiliate will not appear on the name search.
Affiliate Flow
- Users can sign up through the Affiliate URL to become an affiliate under an existing Affiliate’s downline.
- There’s no approval process for Affiliate sign up but the signed-up Affiliate status will be “inactive” until the affiliate kit is purchased.
- Affiliate can now purchase the affiliate kit through the link mentioned in the email or go to the purchase the affiliate kit.
- After a successful purchase, the Affiliate becomes active.
- If an Affiliate becomes Inactive, then the downline should be moved to another Affiliate.
Affiliate Benefits
- Affiliate will receive an upfront discount on their purchases. This discount tier is based on the Affiliate Level or Manual tier which is provided by the admin. Affiliate levels are calculated every month and reset every month based on the previous month’s sales. There will be several levels based on their previous month sales and both discounts as well as commissions will be calculated based on their level.
- Affiliate Payout Request :
i) Affiliate can submit a payout request from the available commission.
ii) Affiliate can also see the payout request history, edit and cancel the payout request.
Affiliate URL (Referral Link)
- Each Affiliate will receive a dedicated URL.
- When customers visit the website using the Affiliate‘s URL, they will be able to shop on the site and see affiliate’s profile details.
- Once the Affiliate is selected, then a ribbon with Affiliate details will be displayed on top of every page (except checkout), along with the Affiliate image.
- If the customer is attached to an Affiliate but uses another Affiliate referral link now that Affiliate’s profile ribbon will be displayed, and the order commission will be credited accordingly.
Affiliate Hierarchy and Commissions
- Affiliates can refer to other customers, who will become part of their hierarchy.
- Affiliates will get commission which is configured in the admin through Tier mechanism.
- The actual commission amounts will be manually paid to affiliates.
Find an Affiliates
- There will be a feature to search affiliate based on the First and Last name and Email for attaching the customers to the Affiliate.
Loyal Customers
- Once a customer becomes a host they will be get their party referral URL. Once an order is placed, they will be marked as Loyal customers, and they receive Rewards for the parties for which they assigned as host.
- Any order placed against that party will receive Rewards.
- Loyal customers can also share the referral URL to others to place orders and earn Rewards if they have an active party.
- Loyal customers can host only one party at any given point in time.
- The Rewards stay valid for a period configured by admin in rewards points configuration.
2. Commission
- Commission calculation will be based on the Tier and the values are configurable in admin.
- Commission for an order will be calculated as below :
- Net product amount = Gross Order total (subtotal) – discount (tier discount+ rewards+ Shopify discount).
- The product price will be used for any commission calculations.
- The total value of self-orders placed by the Affiliate on previous month will be used for figuring out the tier of the Affiliate of the month.
- Commissions will be calculated based on the orders placed by the Affiliate. Self- orders in parties will be included as well.
- commissions gained for orders that were cancelled will be automatically clawed back.
- commissions gained from Returned Orders are manually adjusted (claw back).
3. Affiliate Referral Flow
- Newly Onboarding Customer (With a referral link).
- Existing Customer (Without a referral link).
- Guest Customer.
Newly Onboarding Customer (with referral link)
- When the customer follows an Affiliate’s referral link to reach the store and registers as a new customer, the Affiliate will be directly attached to the customer.
- Registered customers will get Rewards when they place orders through the referral link.
- If registered or anonymous customers do not come through an Affiliate or party URL link and place an order, they will not get the Rewards.
Existing Customer (without referral link)
- If the customer registers as a new customer without a referral link and decides to use a referral link after registration, then the Affiliate will be directly attached to the customer.
- When the customer does not have a referral link, the customer will be allowed to select an Affiliate from the list of Affiliates. They can search for the Affiliate based on name, email using find an affiliate.
- Registered customers who are already attached to an Affiliate will not get the choice of choosing another Affiliate.
- Affiliates will call customer service to remap them to another Affiliate and the options will be provided in admin.
- When a customer comes through a referral link then the Affiliate of that referral link will get the commission and not the Affiliate to whom the customer is attached.
Anonymous (Guest) Customer
- With Referral link: When a customer follows an Affiliate referral link to reach the store and doesn’t register as a customer and places an order, the Affiliate will earn commission for the order that was placed.
4. Host Rewards Program
Party Creation
- Active Affiliates can create a party and attach any customer as host and that customer will have a URL once they become a host and they can share their party referral URL. Orders placed through party referral URL will be tagged into the party that loyal customer is a host (for active party).
- Host can have only one party active at a time.
- Affiliate also can have only one self-hosted party at a time.
- The start date will be default to the party creation date.
- The end date will be chosen by an affiliate.
- Party creation fields: Party name, Start and End Date, Self-host check box, Party Type (virtual and physical party), Host search, Host email and address.
- If a user (host) is already registered in the system but not yet associated with an affiliate, the affiliate can map them as a host for their party by using the host’s complete email address. However, the host should not have any active parties now.
- If a registered customer not associated with any affiliate, the affiliate could map them host, that customer goes under him.
- Affiliate will have a different menu to create and manage parties in their account dashboard.
Party Orders
- When an Affiliate is logged in and adds products to their cart and goes ahead to the cart a dropdown menu called “Select Parties” displays a list of available parties.
- Party Enddate can be changed only when the party is not submitted.
- Host cannot be changed for a party. Once the party is created, it is active, which will be considered the start date.
- The End date for the party can be set by the affiliate. The party automatically closes at the mentioned end date, or it can also be manually pre-closed if the affiliate requires it.
- In the cart, while selecting a party, a dropdown menu called “Select Type” appears with options: self/customer/host, applicable only if the cart is not empty.
- The Affiliate can then place an order for themselves, a customer, or for the host, based on the selected party, then the order will be associated accordingly.
- If the selected value is “self,” the order is placed for the Affiliate themselves.
- If the selected value is “customer,” the order is placed for a specific customer, and their email ID needs to be provided in the designated text box. Customers will also receive Rewards for their successful order.
- If the selected value is “host,” the order is placed for the host.
- Once the Order is placed and the order is in a paid status, host credits will be calculated based on Reward Percentage.
- If the Order status is not paid, then Rewards will not be awarded.
- When the host shares their referral URL and if the customer places an order, then the order will automatically be added to the active party for which they are hosting.
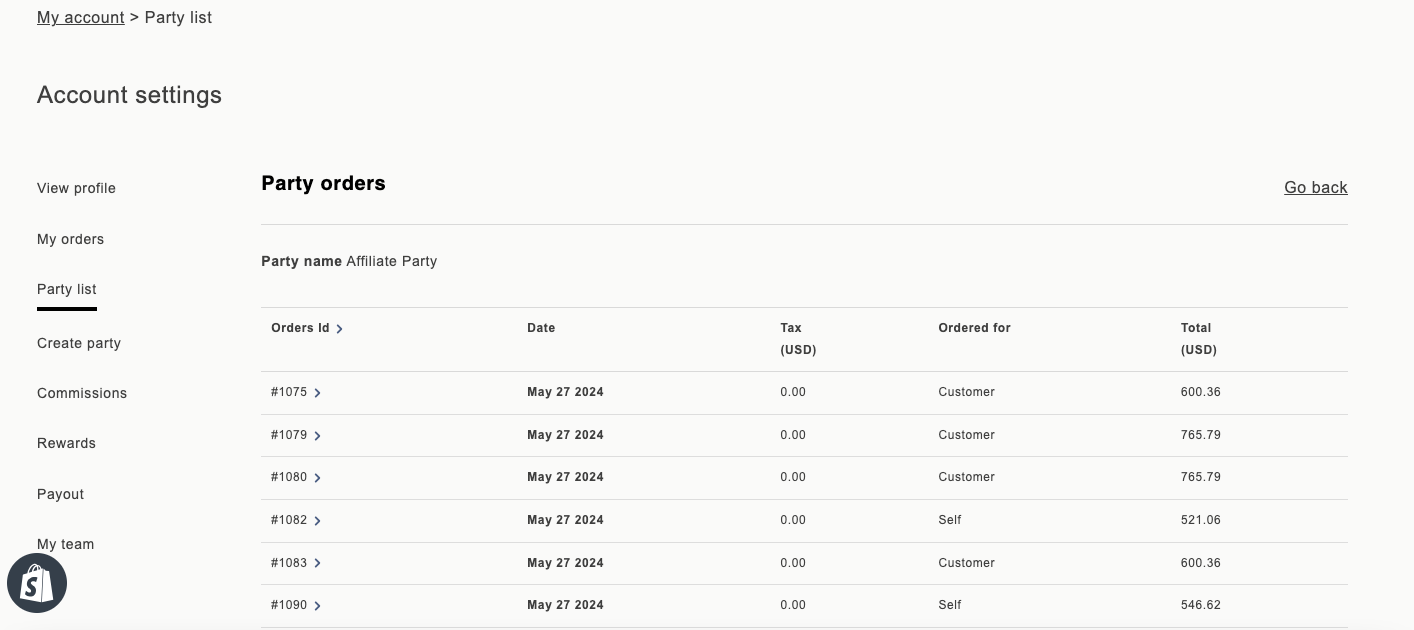
View Party Orders
- Both the customer and the host/Affiliate can be able to log in and view orders under My account page.
- “Ordered for” column to include the following party order details “Host, Affiliate, Customer”.
- They can see orders that were placed by them as well as orders placed by Affiliates on their behalf and will be mentioned under “Ordered for” column.
Party Order’s Credit
- Affiliate will get Rewards based on the order total (net amount).
- In case, the host is different from Affiliate, then the above criteria are not applicable, and the host will be eligible for Rewards and Affiliate get commission (based on tier) for every single order total (net amount).
When parties are closed
- Affiliates will have a choice to close the party manually within the end date using the “Close party” button, available on the party list page.
- The party automatically closes on the end date chosen by the affiliate.
- Display all the parties which had been closed in admin dashboard under the Affiliate and affiliate account dashboard who is hosting it.
5. Rewards
Menu for Rewards
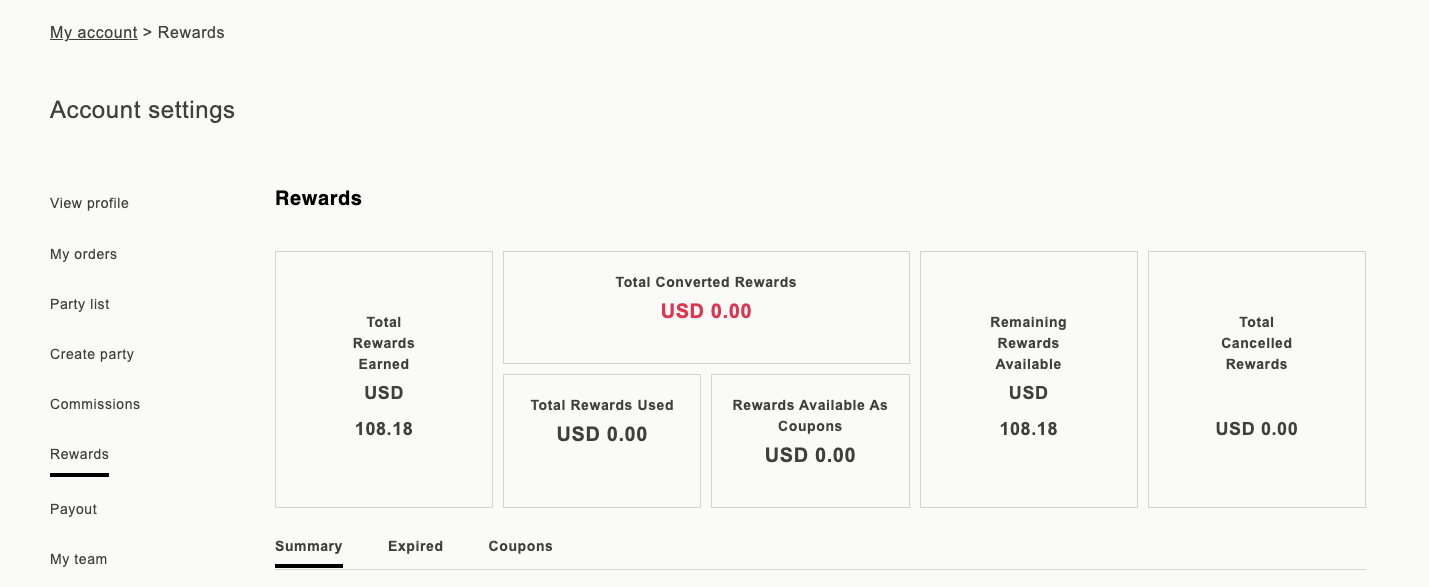
Once the verification confirms that the logged-in customer is a customer or affiliate, then the rewards point information will be displayed under their “my account” with a separate sub-menu for Rewards.
- Rewards menu : Menu displays details of how the rewards points were earned and spent.
- Coupons : Every Reward is redeemed using a coupon code so all the coupons used and active will be listed in this tab.
Allocate & Redeem Rewards (on each order)
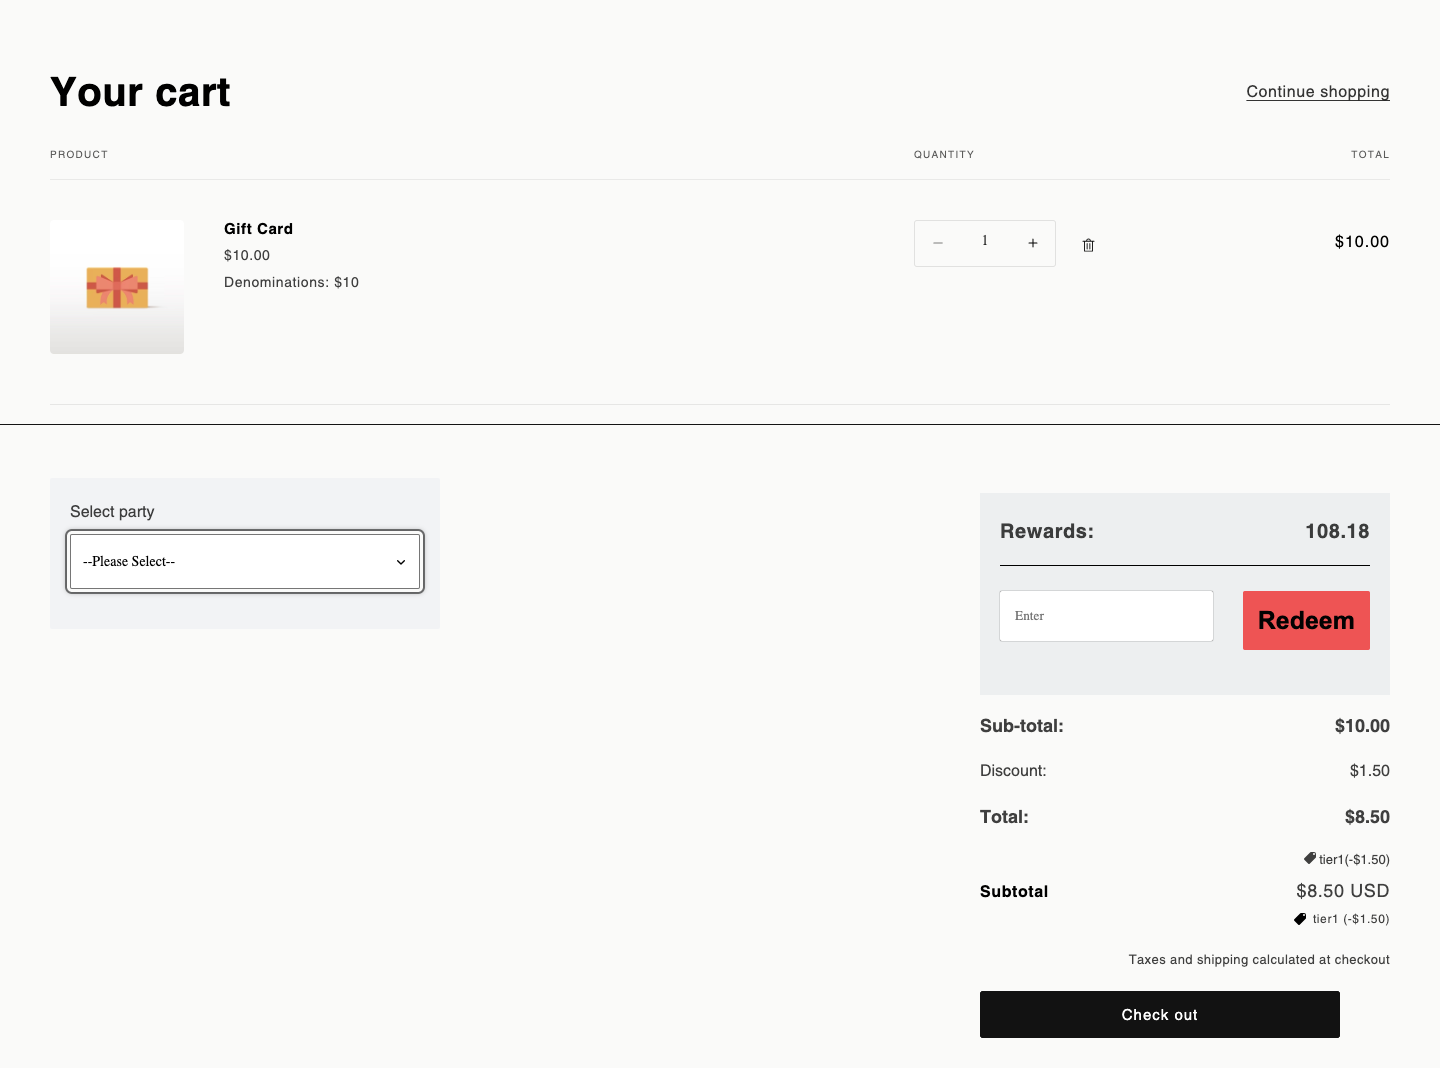
a. Create Rewards on each successful order (Gets Rewards)
- When a customer adds products to the cart and goes ahead to checkout, display the available rewards that can be redeemed.
- If the customer’s (Host or Affiliate) available Rewards not equal to zero, an input field is enabled. This allows the customer to enter the redeemable number of Rewards they wish to apply. The entered amount cannot exceed the total remaining Rewards.
- Upon submission, we will create a coupon for the amount provided. This coupon will have the expiry date of the rewards point that is reduced. Coupon is stored in the customer my account page, and this will be displayed in the cart when the user returns.
- When cancelled order, rewards will be reverted.
- If a customer places an order and redeems some Rewards as an order auto discount but later decides to cancel the order, the Rewards that were applied for that order will be adjusted back automatically.
b. Rewards for Party orders
- Hosts will also receive Rewards for each party order.
- Affiliate will receive the commission but the order which they placed on customer’s behalf, will award Rewards to the respective customer.
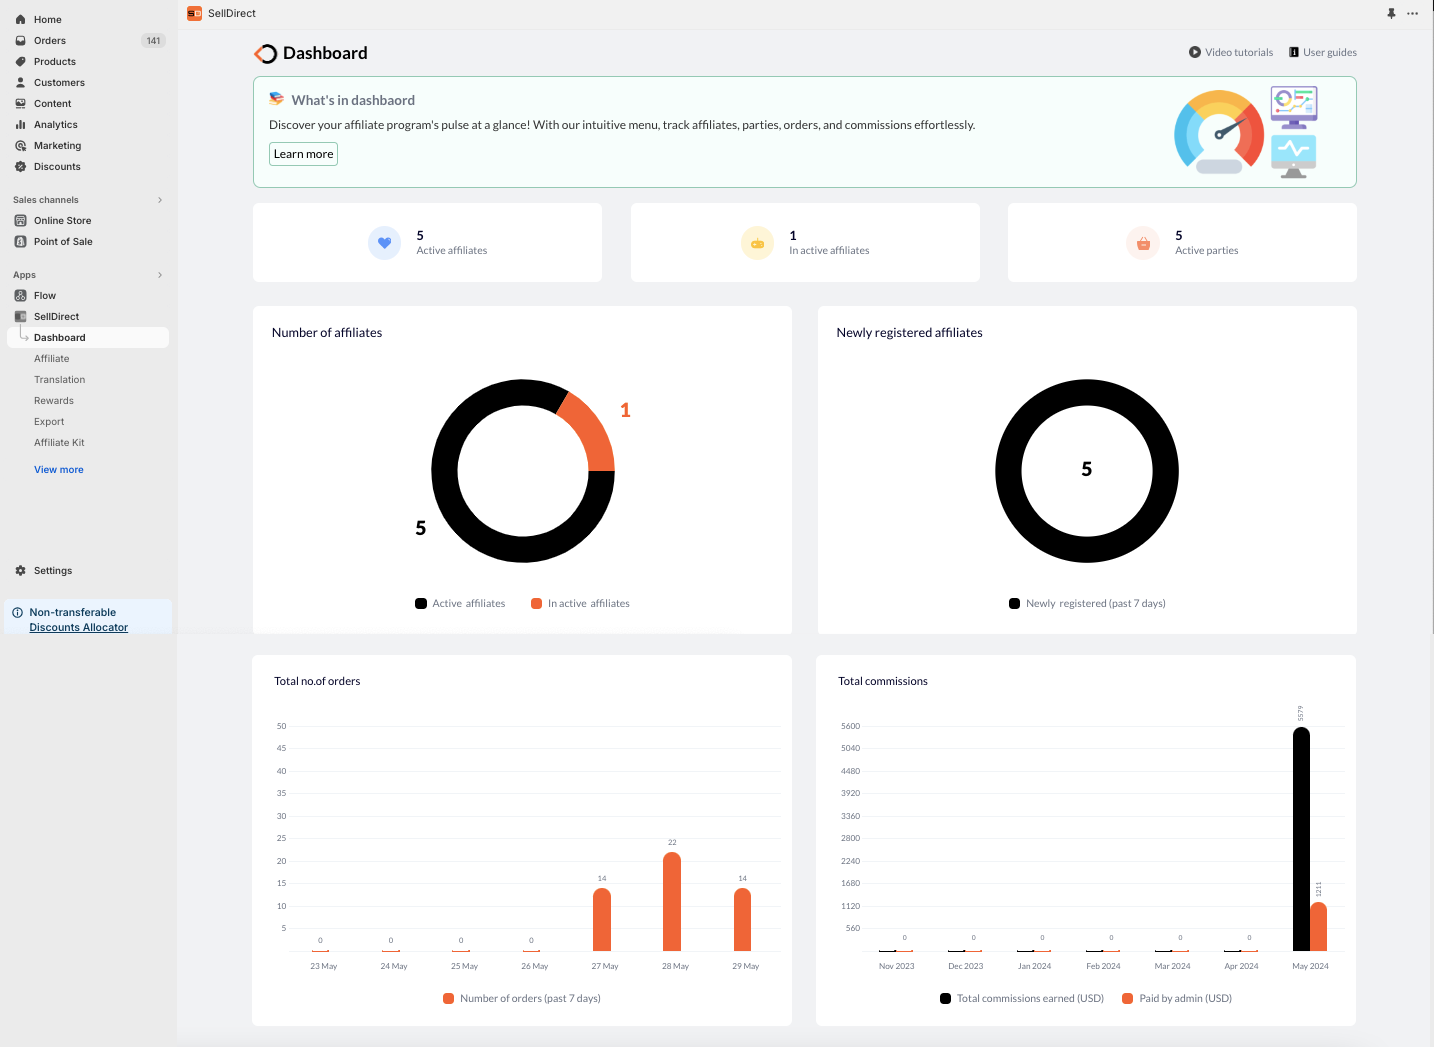
6. App Admin Side
Dashboard
- A menu will be available to show the details of the total number of affiliates, parties, total orders, and earned commissions.
- Admin can view the count of active and inactive affiliates in the affiliate pie chart and count of active parties in party pie chart.
- Admin can view the orders placed by affiliates in the last 7 days in the order bar chart.
- Show the commission earned and paid out by the admin monthly for the last 7 months in the commission bar chart.
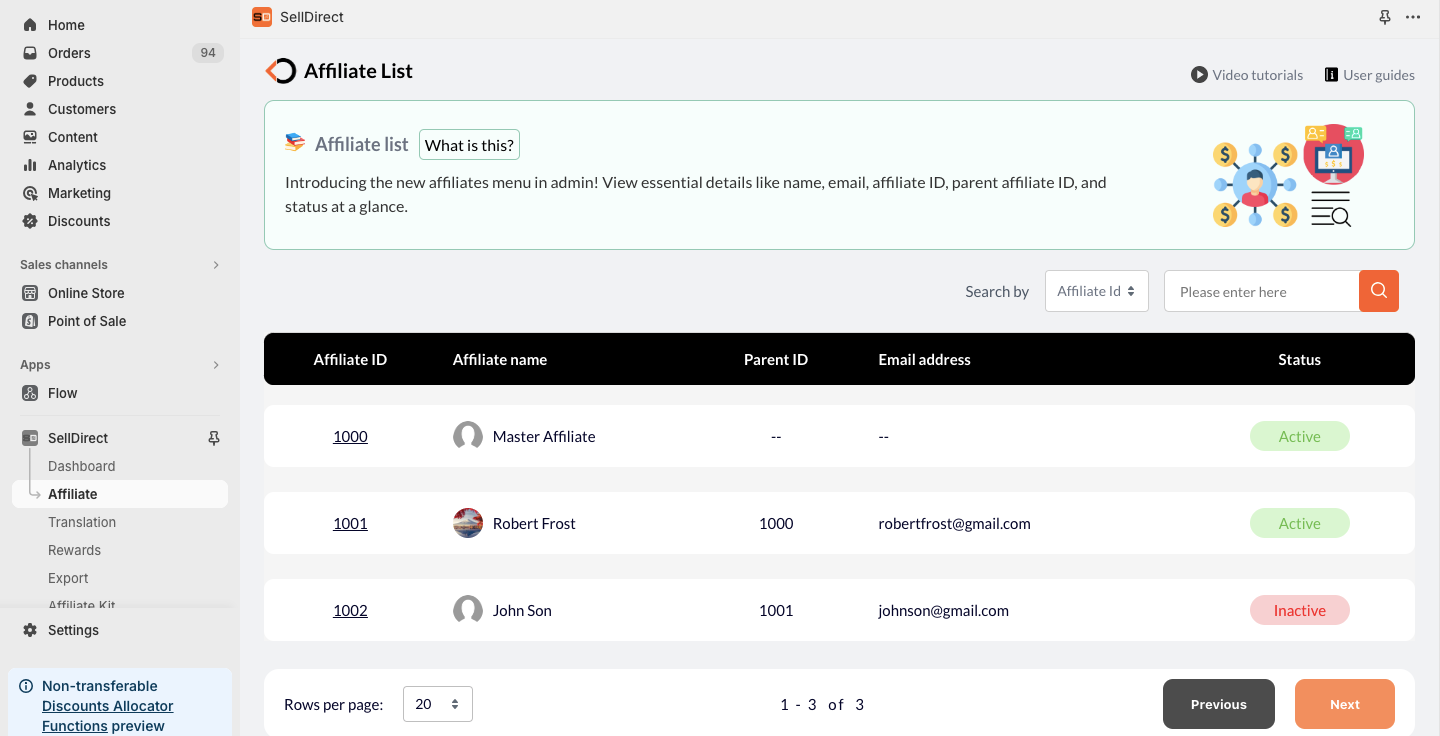
Affiliate List
- There will be a menu to list all the Affiliates in admin.
- Fields displayed: Name, email address, parent affiliate ID, affiliate ID and status.
- Each Affiliate will have parent affiliate ID.
- Use affiliate Id/email/first name/last name to search affiliate.
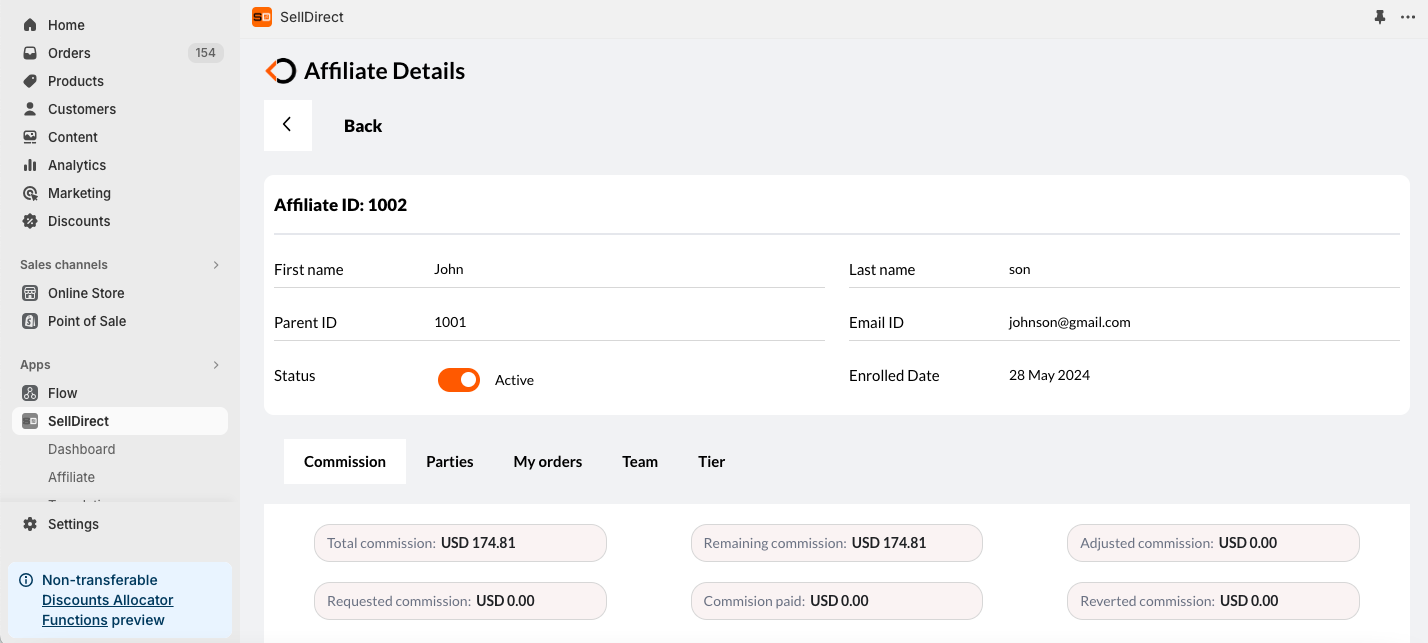
a. View Affiliate
- Affiliate details will include their status, first name, last name, email, parent ID.
- When admin can make them active or reactive, tier discount applied based on earlier month/default tier.
- Admin can make them “In-active”, tier discount will be removed for that affiliate.
- When an affiliate’s status is changed to inactive by the admin, their downline moves to another affiliate.
- Admin can then select the downline affiliate and attach them to another affiliate.
- Admin will have the following menus.
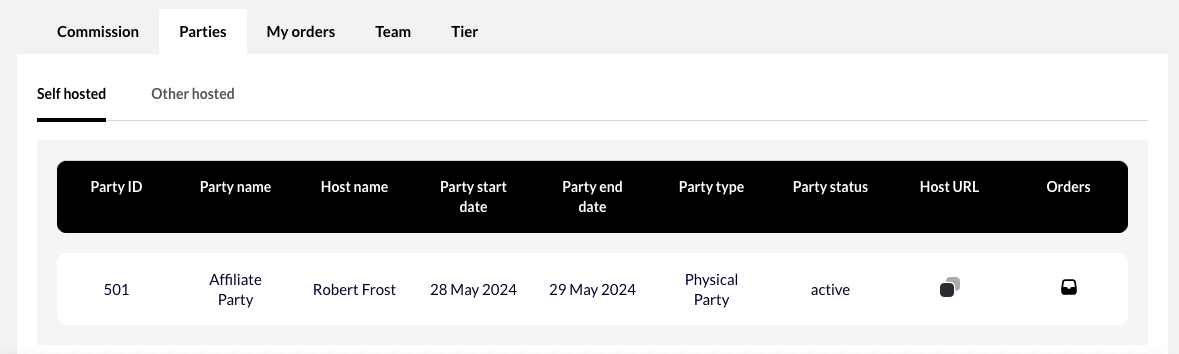
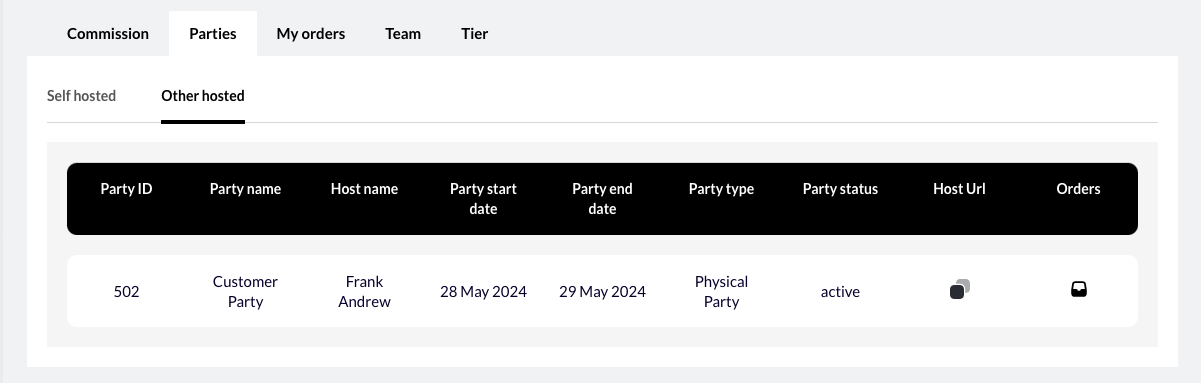
View Affiliate Parties
View details of currently active and closed self-hosted and other hosted parties, including party details such as orders placed using the Party URL.
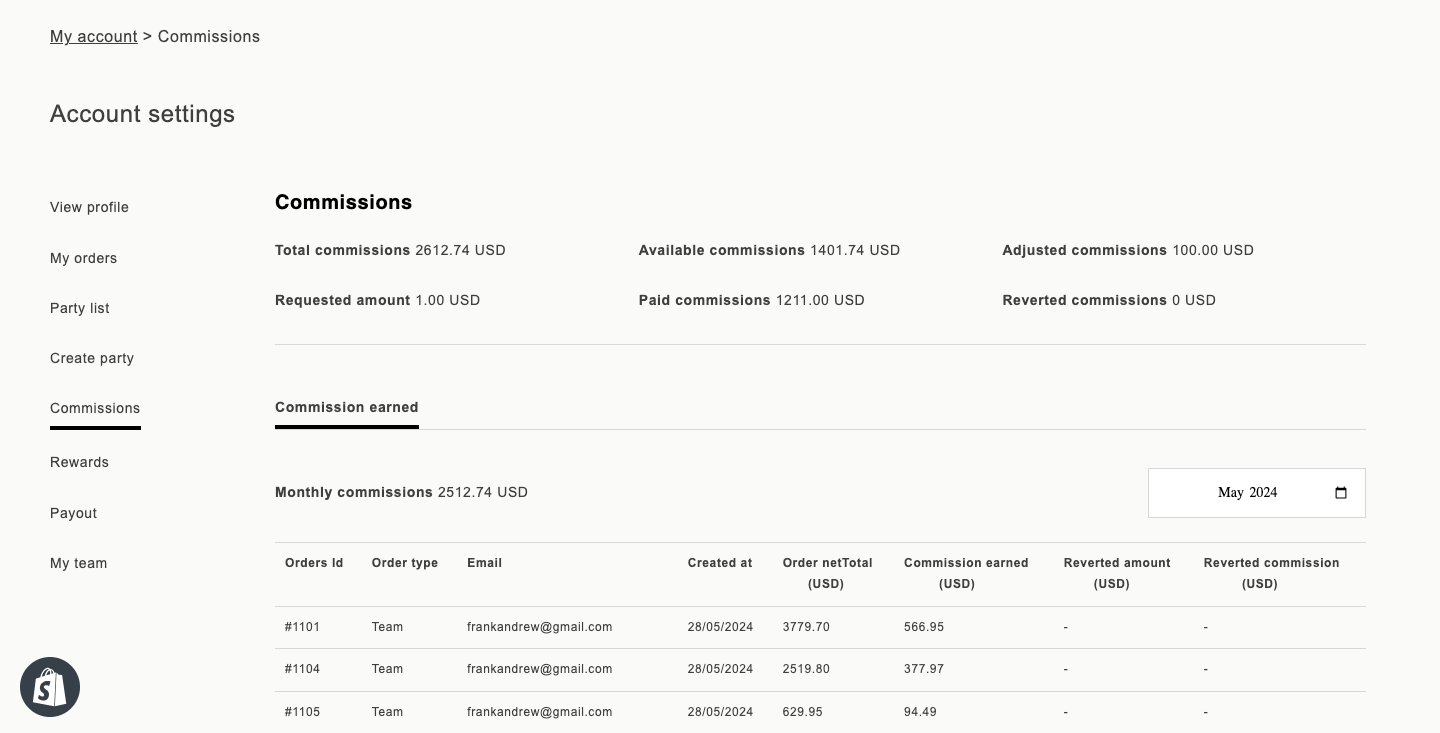
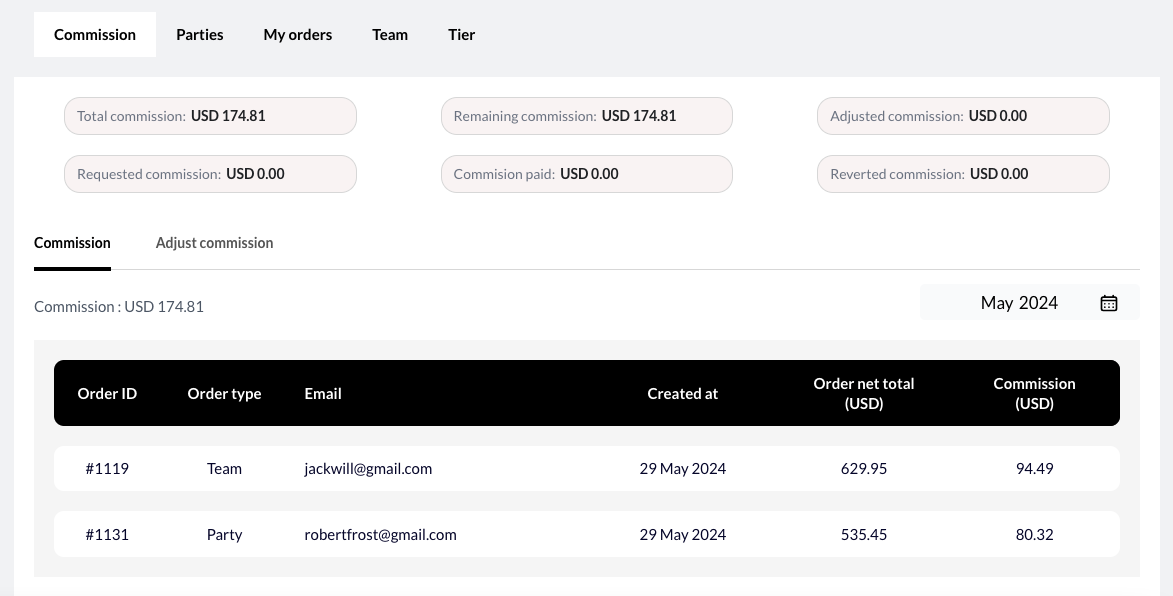
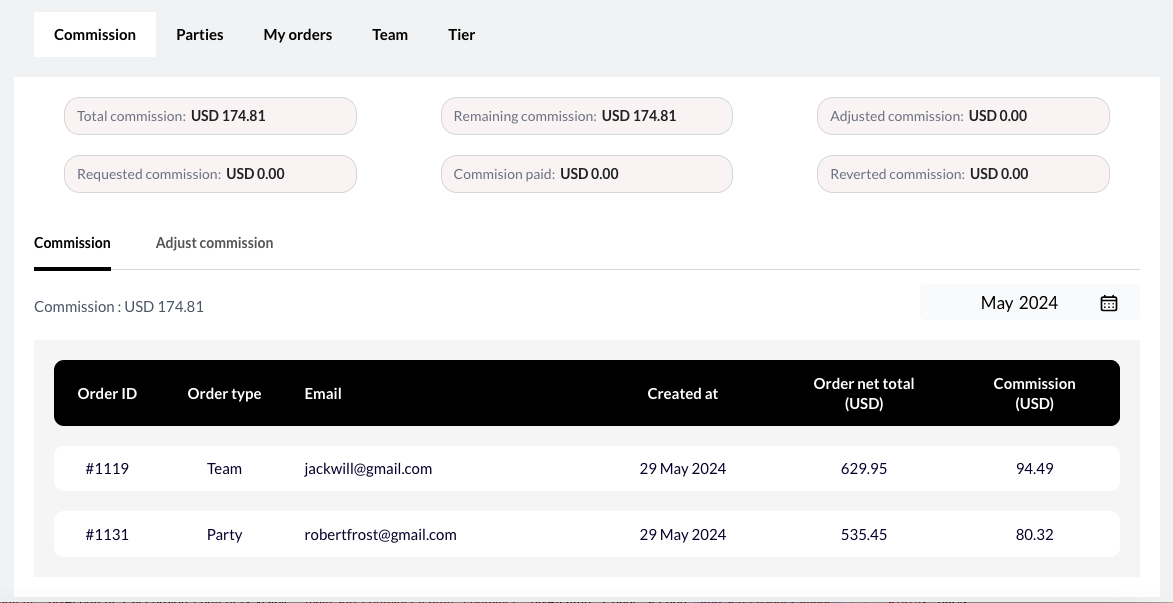
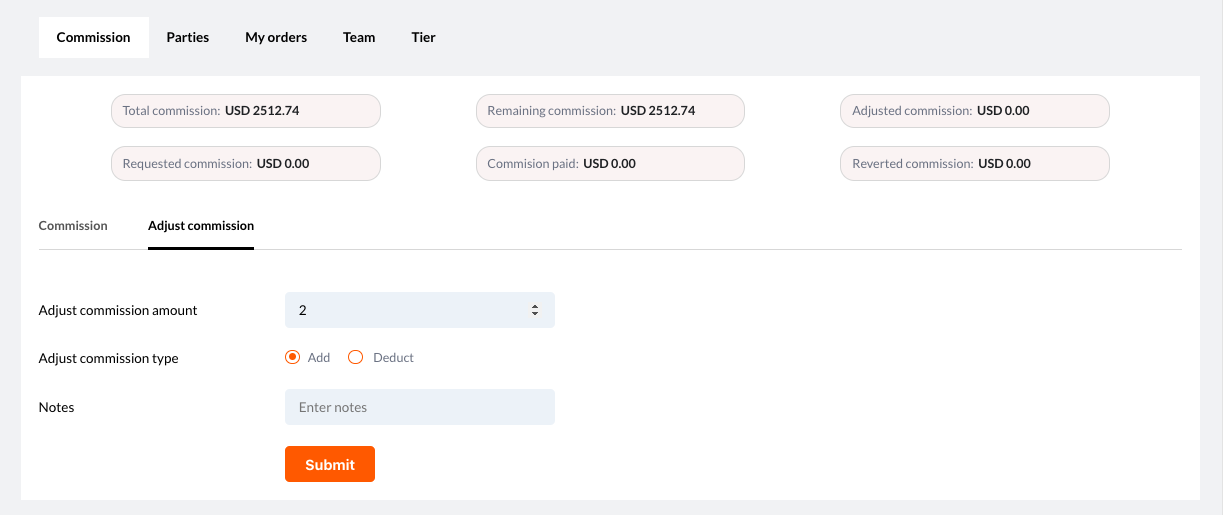
Commission
To view the affiliate commission amounts earned for a selected month.
Adjusted commission tab will allow the admin to add/deduct commission amount from the available commission.
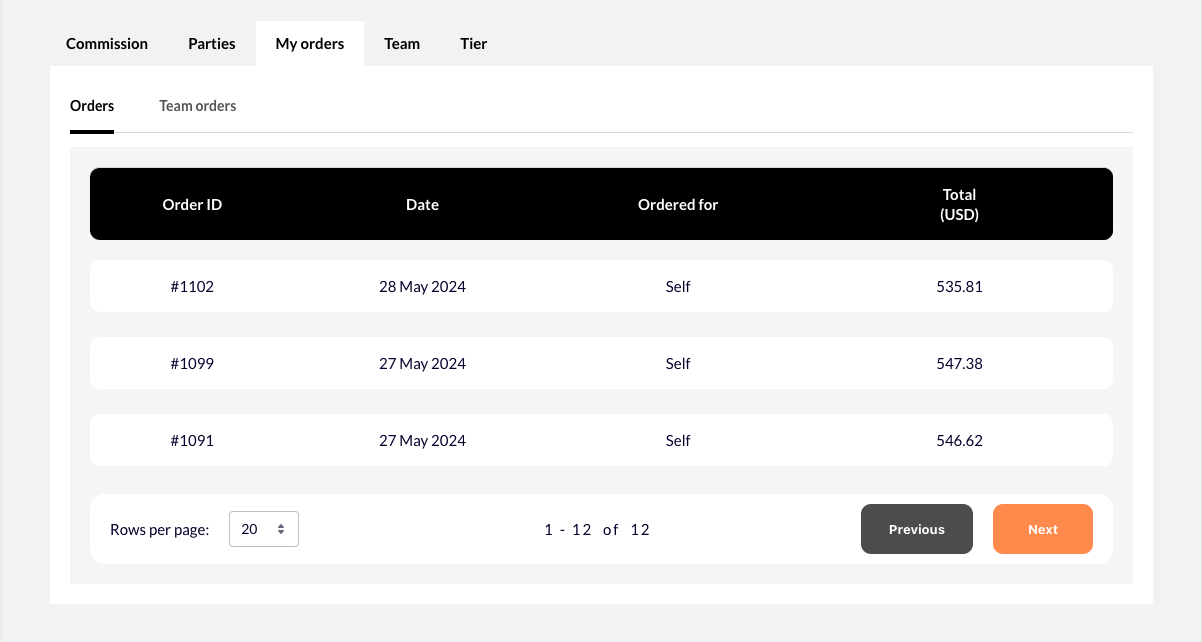
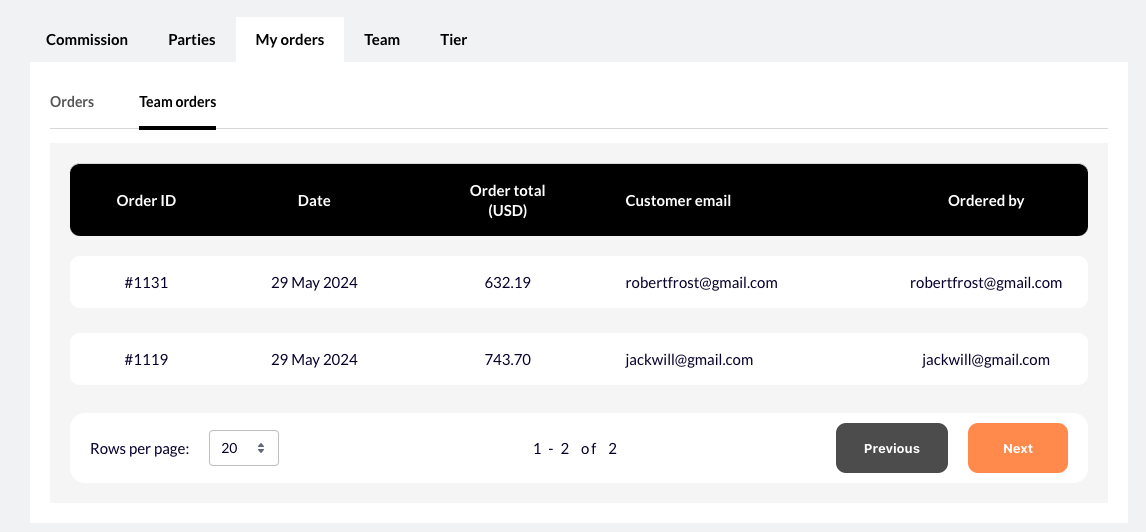
My orders
Orders –includes orders list placed by an affiliate and team’s orders
In team Orders, see orders placed by Affiliates on their behalf and will be mentioned under “Ordered By” column.
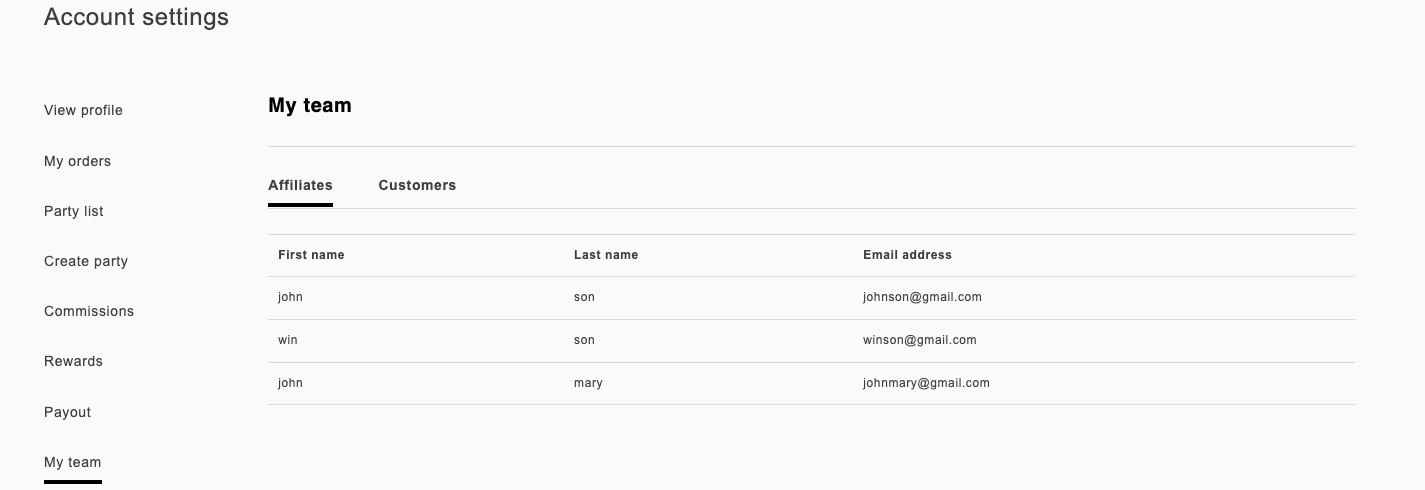
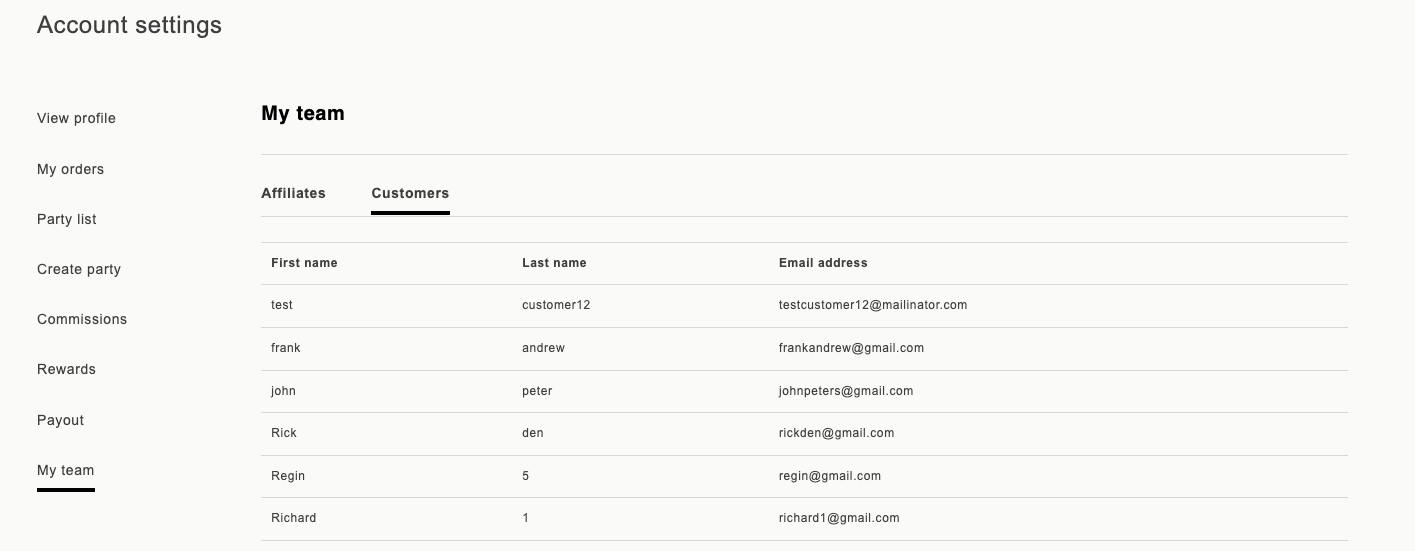
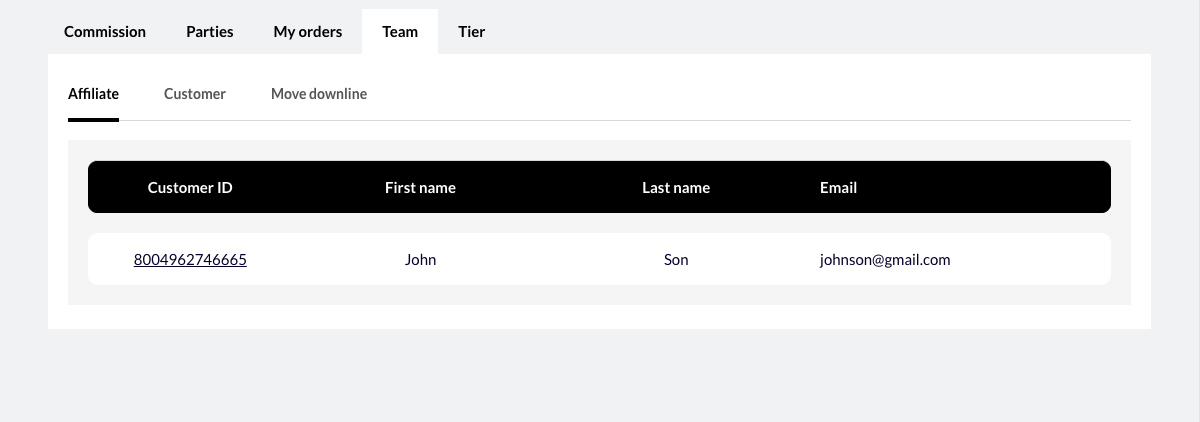
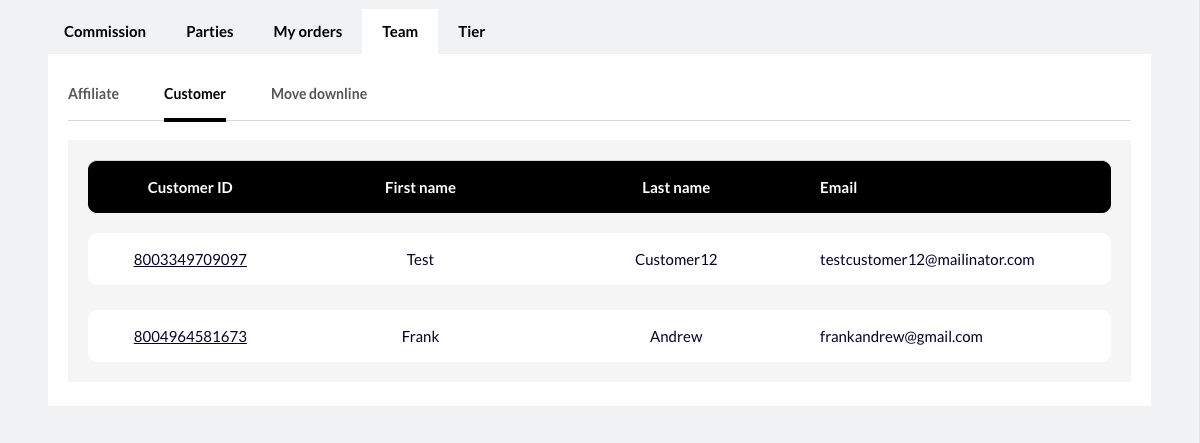
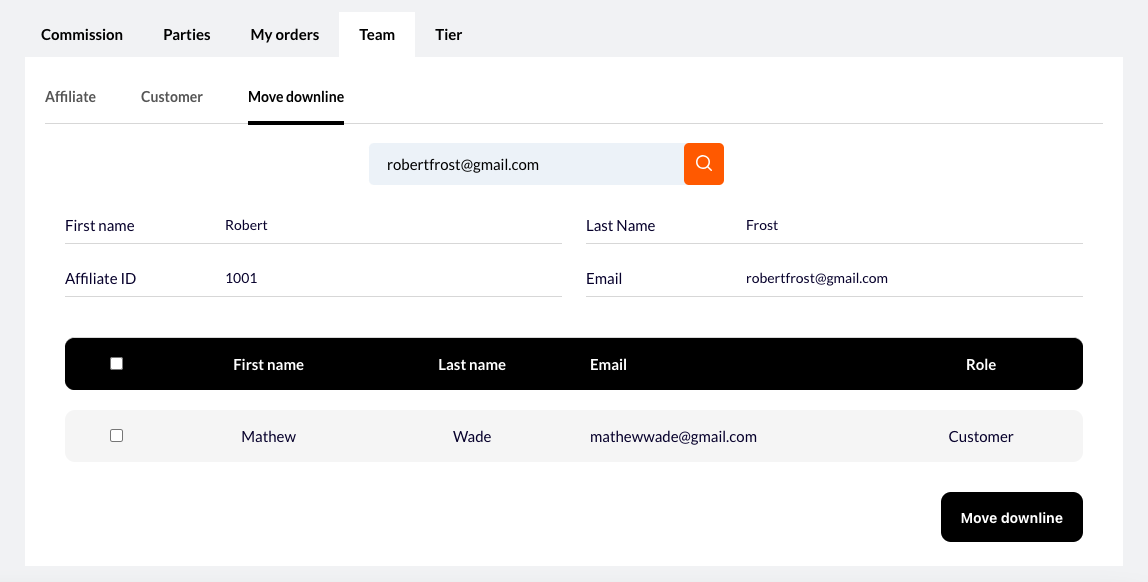
Team
In the Team tab, the customers and affiliates attached with this affiliate will be displayed.
Use the “Move Downline” option to link your customer with another affiliate by searching for their email and adding them under that affiliate.
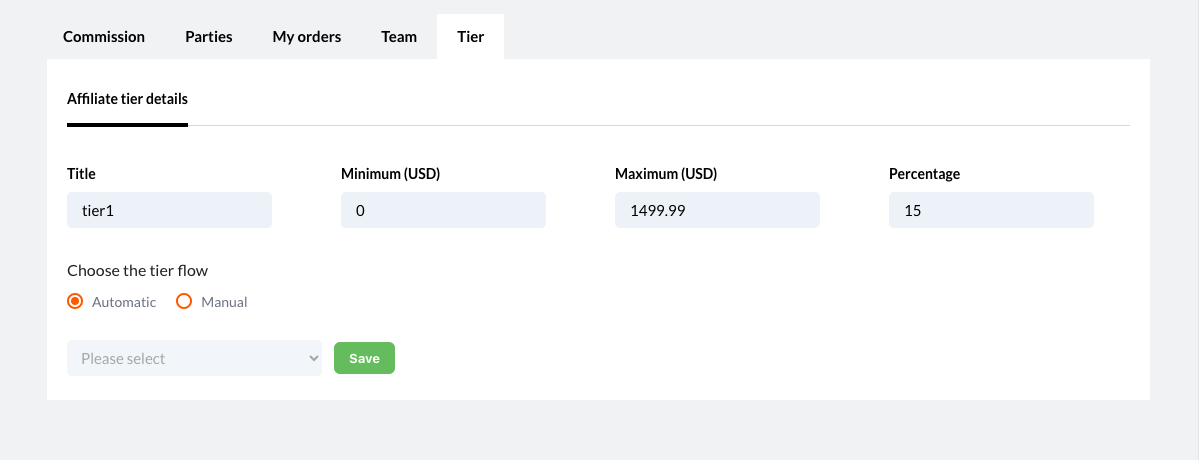
Tier
Display the Affiliate tier detail and admin can manually adjust manual tier from automatic tier.
When the admin changes the manual tier, the corresponding discount is applied to that affiliate, and commissions are calculated based on the manual tier.
Translation
Providing translation values:
- Have a choice to select language and enter the translation for all the fields.
- Admin needs to enter all the fields manually and cannot edit the key.
- Import the .xlsx file holding translations using sample XLSX template by inputting data for all available languages.
Rewards
- Search customer mail to see the summary of total earned, converted, used and remaining rewards and coupon.
- In the summary tab, details about earned Reward, as well as information on converted rewards and the remaining rewards for each reward.
- In Coupon tabs, see details about coupons (coupon name, status, value and expire date) used by customer.
Export
a. Order Export
- Way to download / export orders based on the date range through Admin.
-
Here are the template headers included in the export
data from Shopify,
Order Number, Affiliate Id, Primary Affiliate Id, Email Id, Discounted Amount, Tier, Tier Amount, Other Discount Amount, Order Line-Item Total, Total Price, Total Tax, Shipping Total, Shipping details, Billing Address, Fulfillment Status, Order Status URL, Customer Rewards, Host Rewards, Rewards Used, Commission Earned, Coupon Used, Order Type, Created At and Updated At.
b. Genealogy Export
- It will export all affiliates along with their primary affiliate and respective status.
- The genealogy export having email id, affiliate ID, primary affiliate ID and status.
c. Commission Export
- The affiliate earns commissions through their team orders, and the commission report will be exported for the choosen month and year.
- The commission export having affiliate id, email and name, commission, total adjusted commission till date, total payout,Affiliate Status and available commissions.
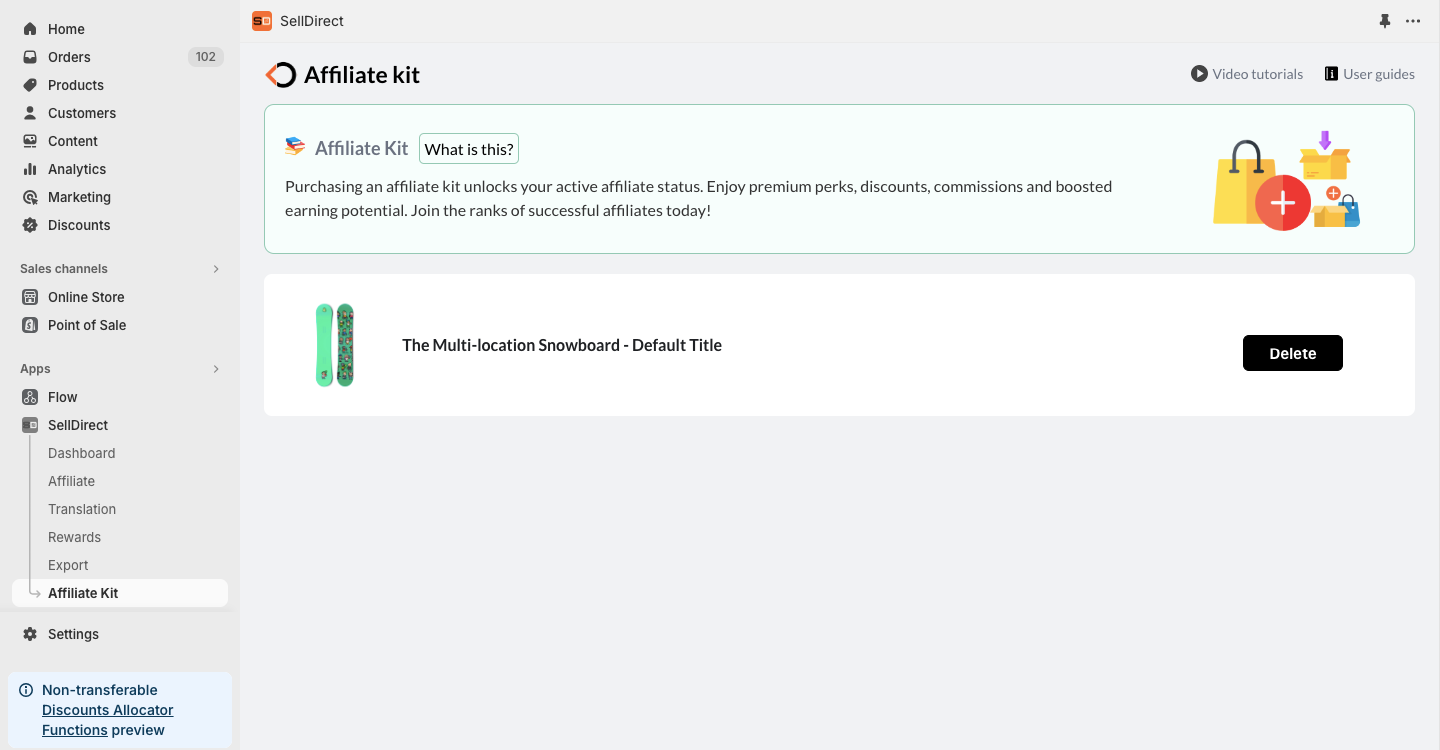
Affiliate kit
- Admin can choose one of the products as affiliate kit.
- When affiliates buy the affiliate kit, start their status as active affiliates, gaining benefits.
Configuration
Following items will include configurable values set
a. Commission/discount for affiliate
- This configuration is configuring the affiliate discount. Affiliate discount is applied when an affiliate shops through the store for himself. This is an automatic discount.
- Admin can edit commission/discount for affiliate configuration, to add more tier level but cannot remove any existing tier discount.
- At the start of every month, discount levels are provided to affiliates based on their sales for the previous month using commission/discount configuration.
- Previous month’s sale – At the beginning of each month, the total sales made by an affiliate during the previous month are recorded as their previous month’s sales.
b. Rewards points and prefix
- This configuration sets a percentage for the rewards given to the customer on their orders. Rewards have an expiry date. That will also be configured in this step.
- The validity for rewards point found by expire date.
- Coupon prefix used as the prefix for generated coupon code when redeeming every reward.
c. Time Zone
- The Time Zone for the store is configured here. Schedulers to update the tier will run based on this time configuration.
- Tier discounts are provided to affiliates at the beginning of each month using tier discount scheduler, based on their respective time zones.
d. Affiliate configuration from
- This configuration customizes the fields to become an affiliate form. There are some default fields in the form. These default fields are not editable.
- Default fields are unable to create again.
- Default fields – First name, Last Name and Email.
- Admin can add and edit the fields and decide the field’s data type here.
- When fields are mandatory, must input the required error message and duplicate fields are not allowed.
- The position of the field can also be changed.
- The admin can drag fields from the active list to the inactive list. When a required field is moved to the inactive list, its ‘required’ status will be changed to false.
- During editing, the admin is unable to change a non-required field to a required one.

e. Master Affiliate
- This configuration is used to set up the master affiliate for the store. The first affiliate will be attached to the master affiliate.
- Affiliate Id is a unique identifier for the affiliate, it will auto increment based on the starting affiliate id.
- If there are no active affiliates, the master affiliate will be displayed. However, if any of them become active, the master affiliate will not be shown.
f. Notification
- Admins can edit the sender email prefix, sender display name and customer support email and see the preview email.
- For example ->no-reply@selldirect.app → In here, ‘no-reply’ (sender email prefix) can be editable by the admin.
- Affiliate registration email – send an email for successfully registered as an affiliate.
- Affiliate Activation email – For an affiliate become an active when buying affiliate kit.
- Party Host Selection email – notifying for their assignment as host for the party.
- Party Order for Customer email– when an affiliate places the orders for customer.
- The support email is at the bottom of the email and can be used for queries.

Payout
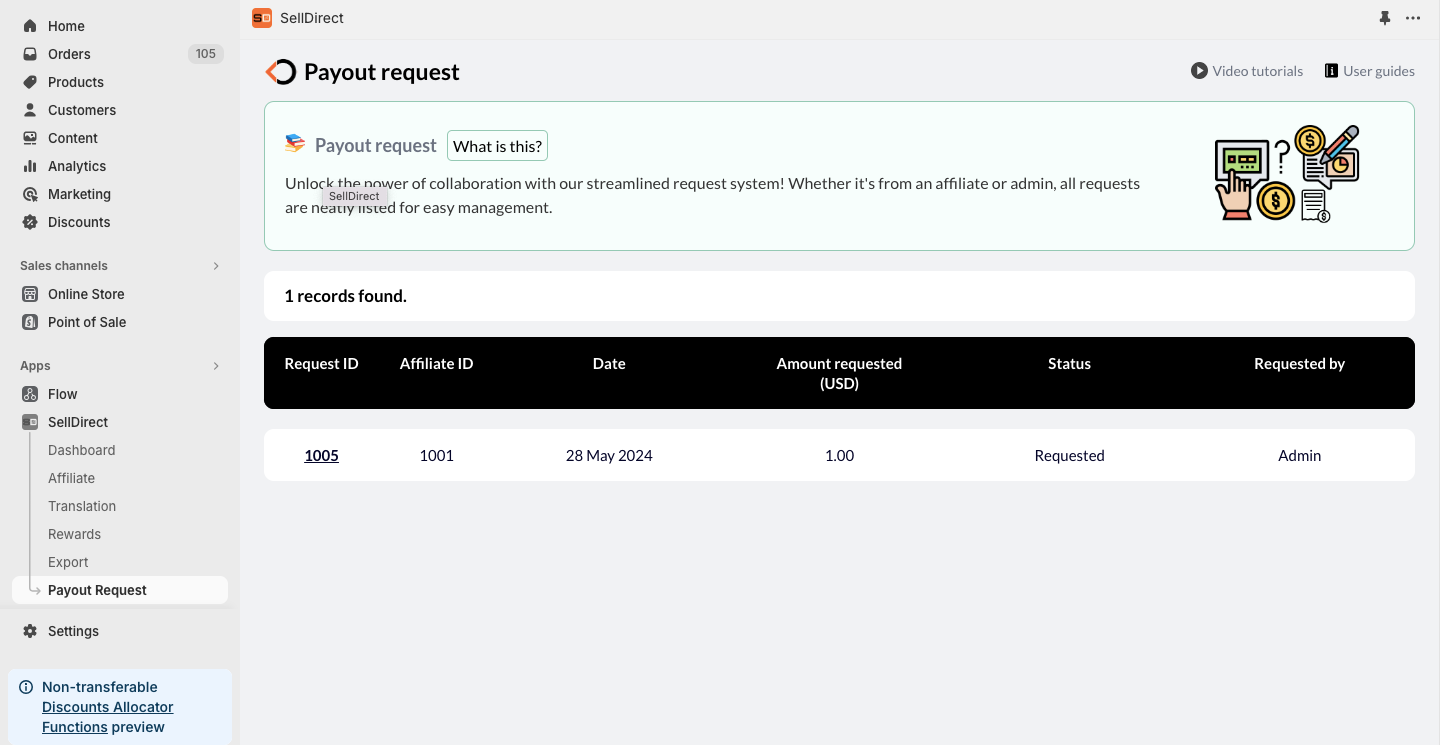
a. Payout Request
- The unpaid requests submitted by the affiliate and admin will be listed.
- Request list will include request ID / affiliate ID, date, amount requested, status, requested by.
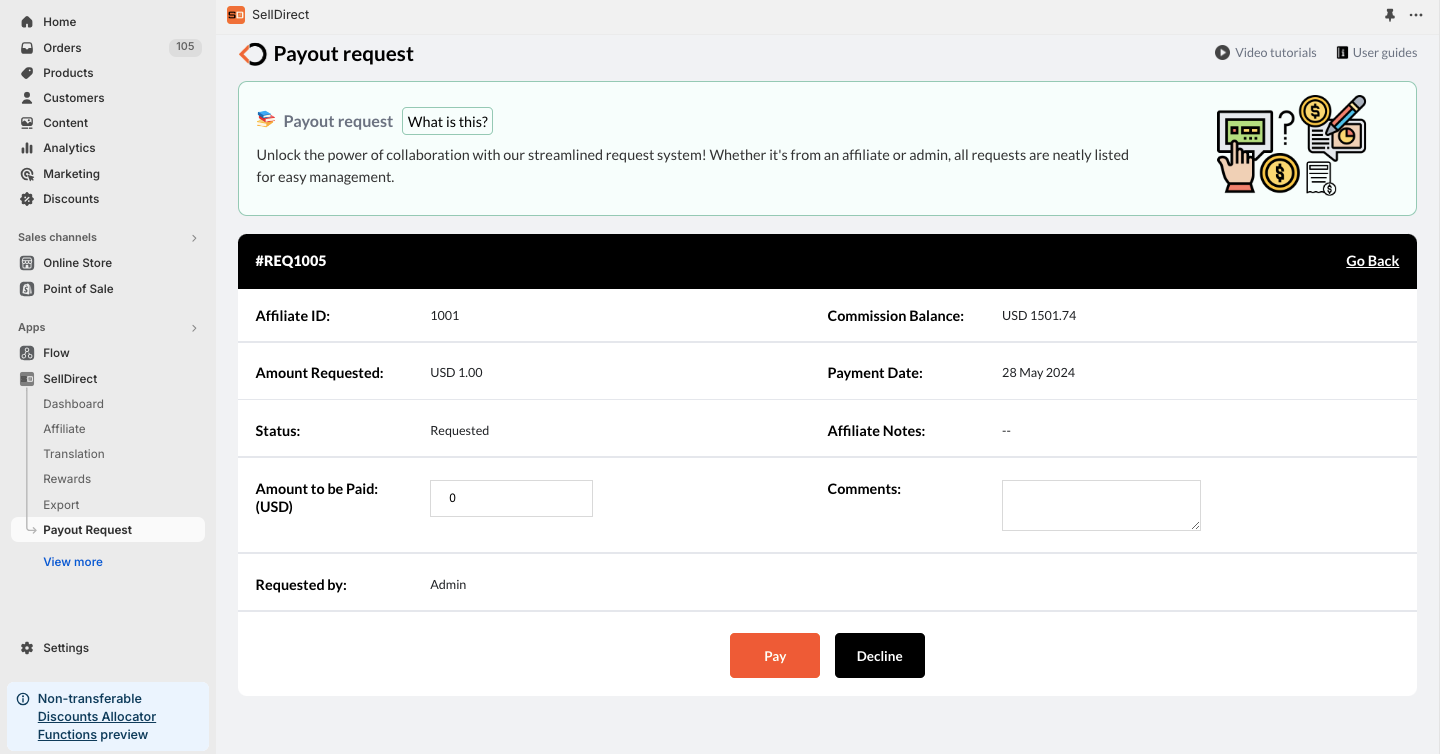
-
Selecting the request ID, will display the following
fields for admin to process the payout.
Affiliate ID, amount requested, amount to be paid, status, Payment date, notes for admin and requested by. - The admin has the option to pay the requested amount in full or a partial amount, which will then be added to the paid commissions.
- Amount will be paid externally.
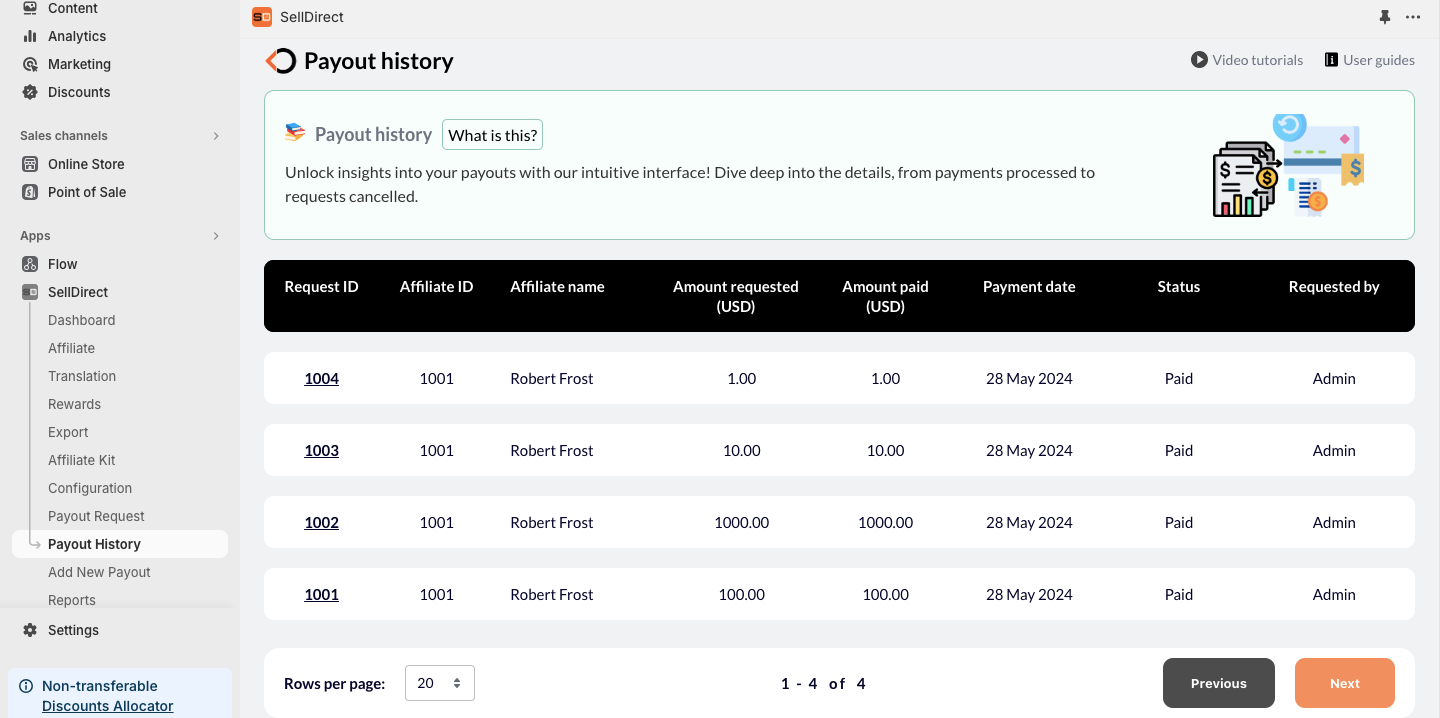
b. Payout History
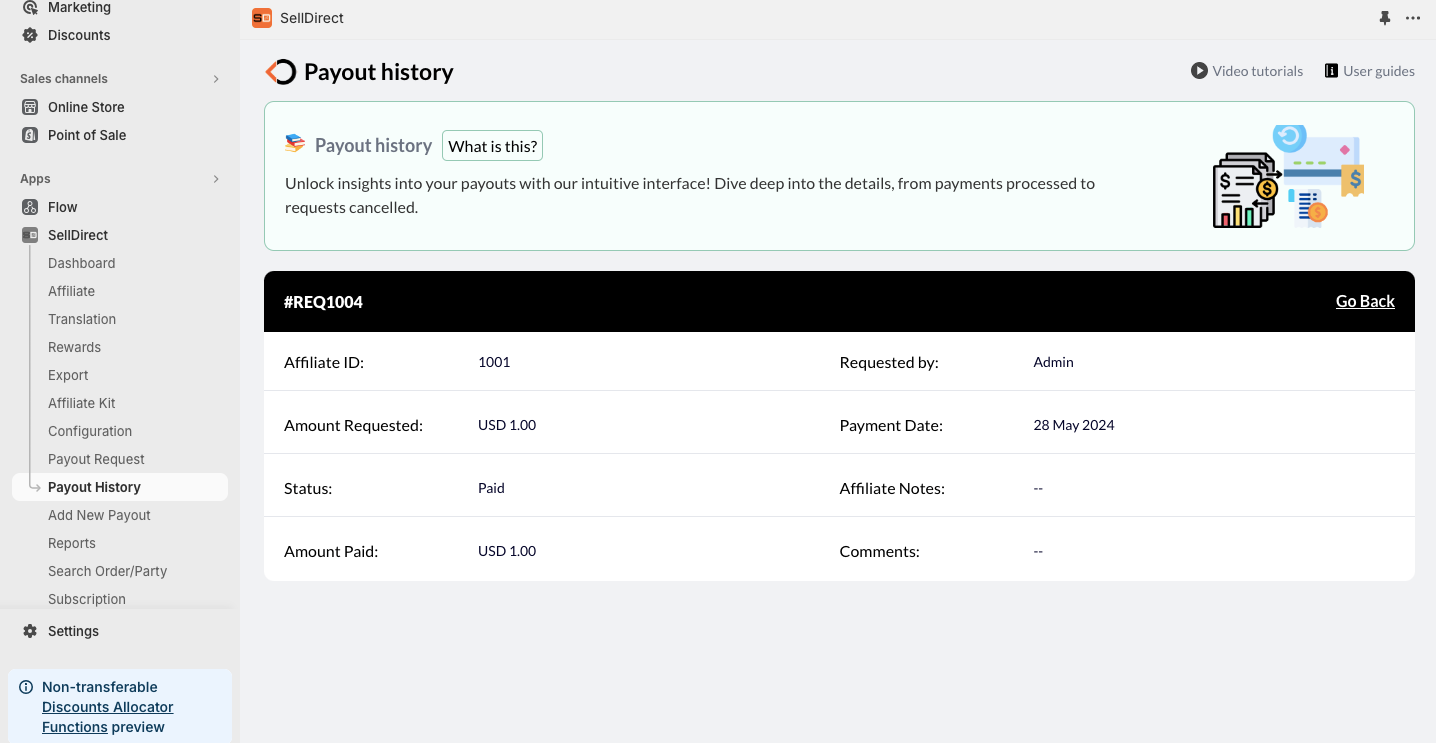
- To view all payouts, including both paid and cancelled transactions, managed by admin.
- The payout detail page displays the amount paid, amount requested, and request status, providing the overview of their payout transactions.
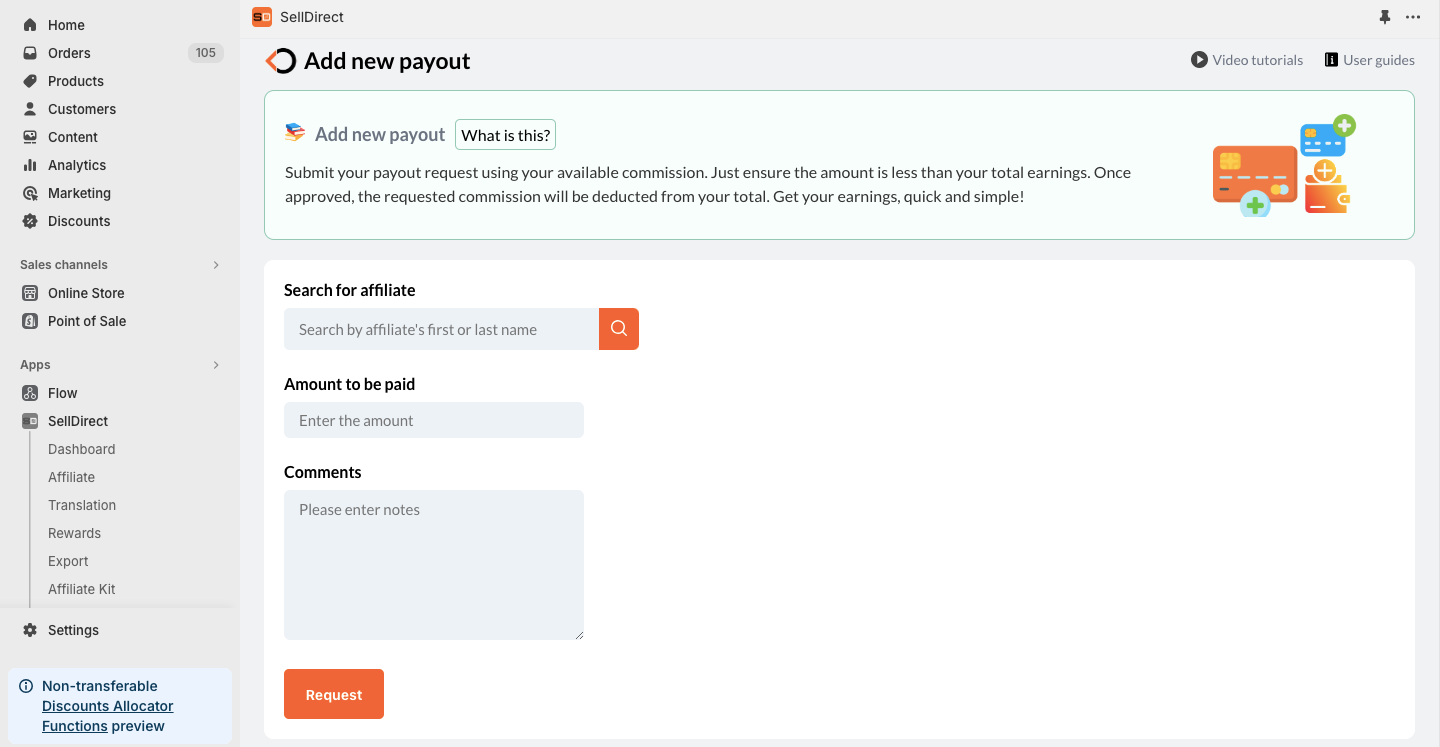
c. Add new payout
- The admin could submit a payout request using the available commission for an affiliate (Fields in the form: Amount to request, comments).
- The admin can only request a payout for an amount less than the available commission.
- There is an option to search and select the affiliate for add new payout.
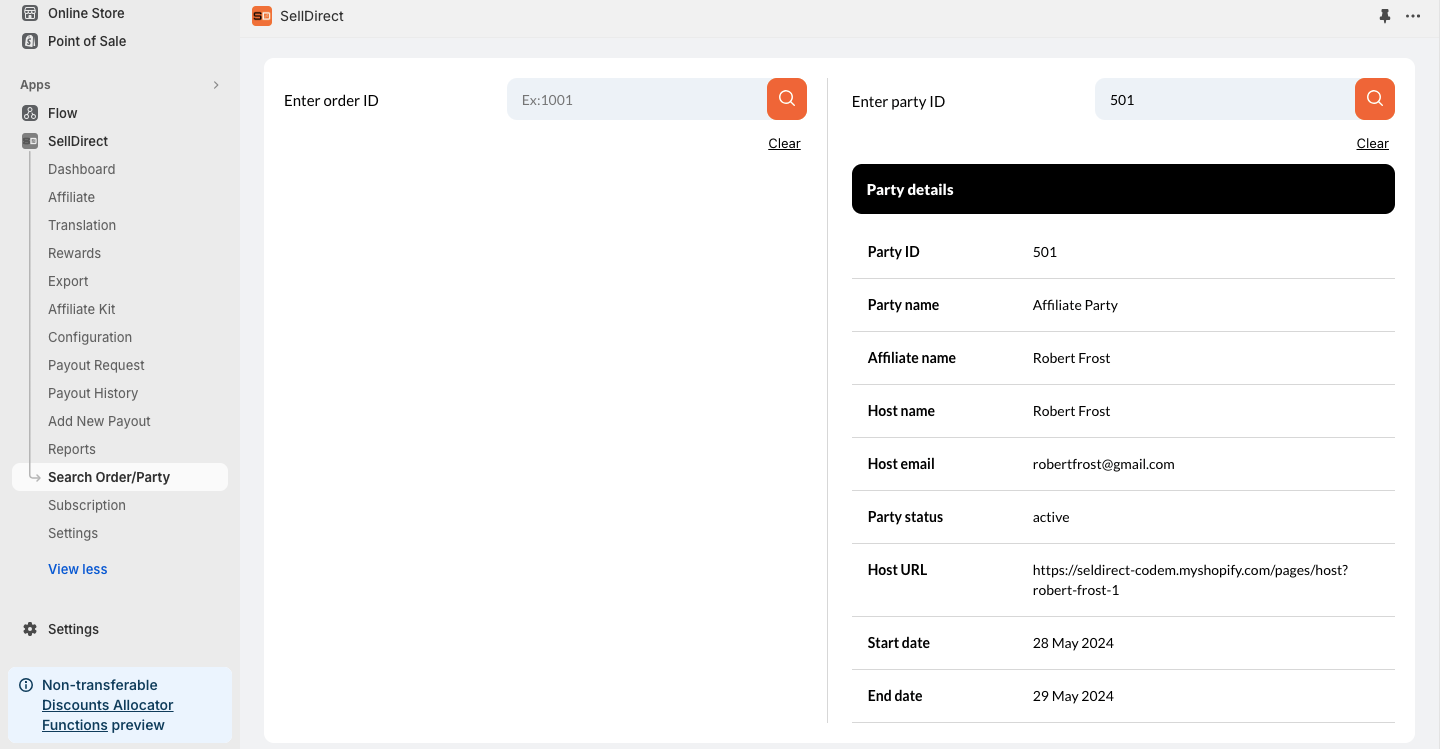
Search order/party
- Admins can search for party and order details using the respective party and order IDs.
- Order details including Order for, Order type, Customer Email, Primary affiliate and Order by.
- Party details including party id, party name, affiliate name, host name, party status, host URL, start and end date.

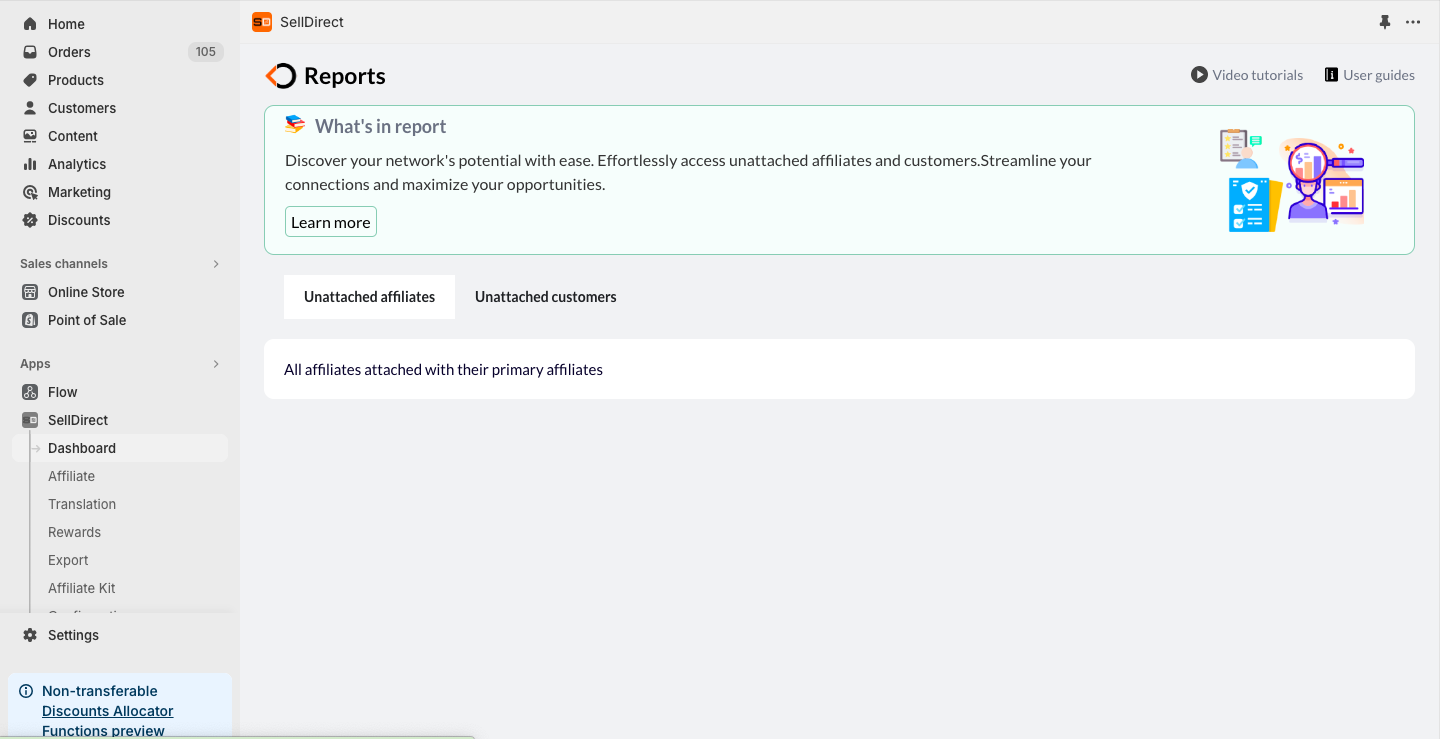
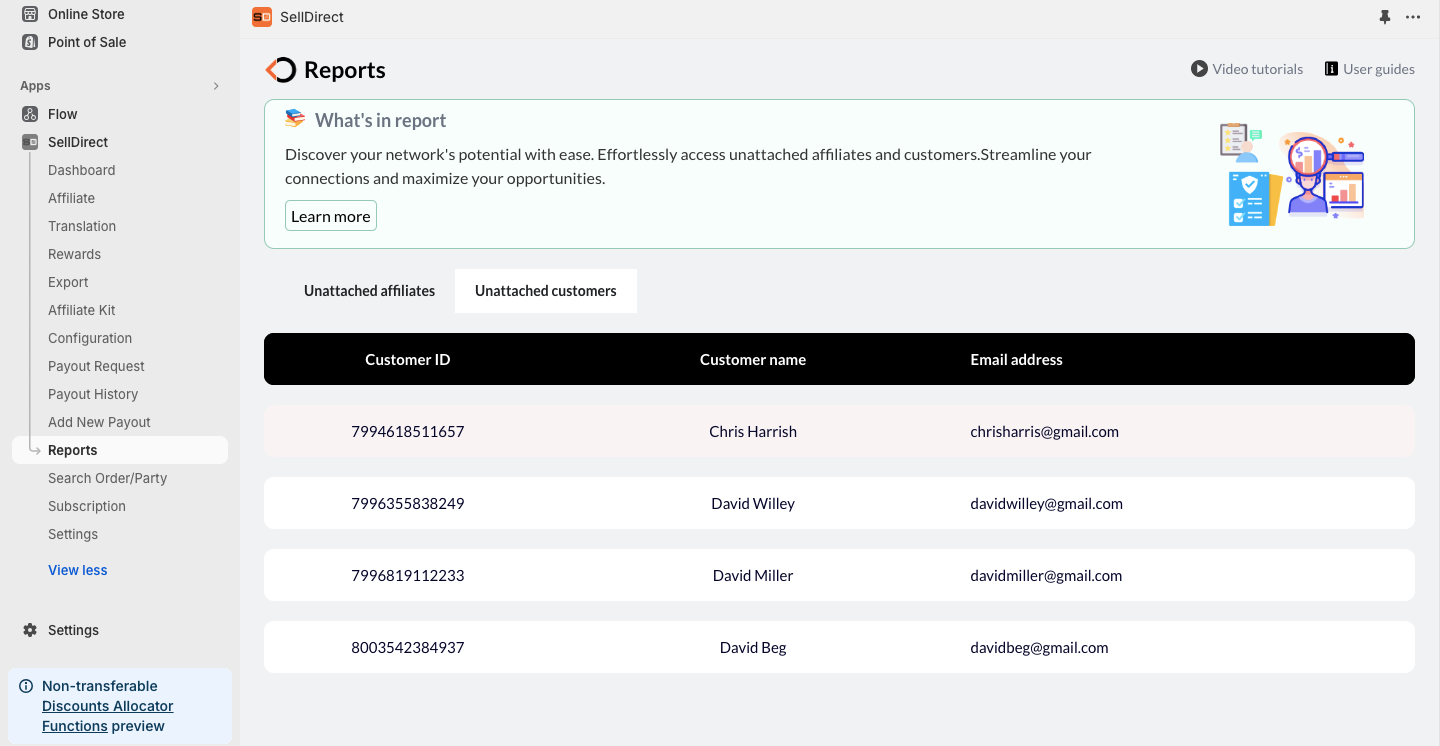
Reports
Show a list of unattached affiliates with their affiliate ID, email, and name and a list of unattached customers with their customer ID, name, and email.
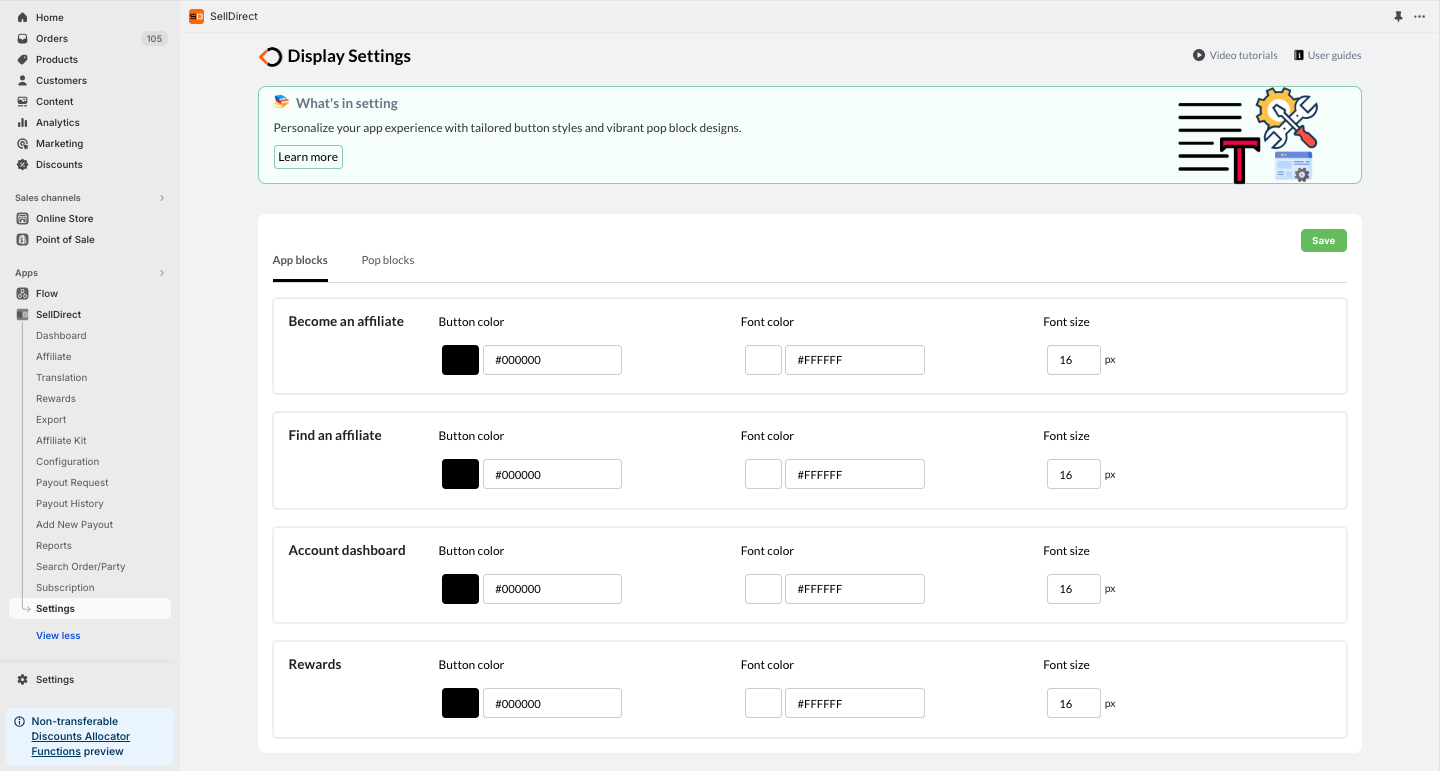
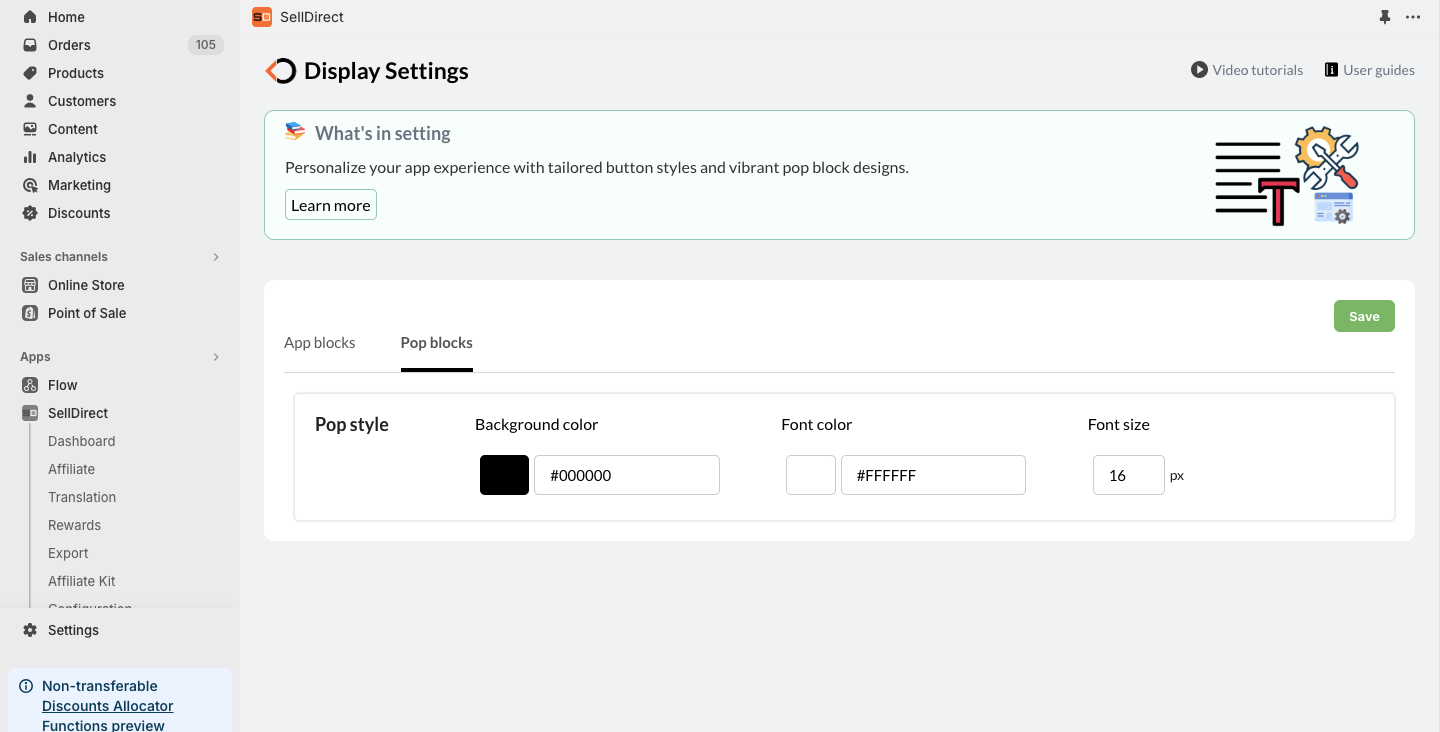
Settings
Admin can customize the button colour, font colour and font size styles for app block of “Become an Affiliate” form, “Find an Affiliate,” “Account Dashboard,” and “Rewards,” as well as for pop block background colour, fand font sizes.
 7-day free trial
Silver Plan
“Start Strong with Silver”Kickstart your journey with the Silver Plan, ideal for individuals and small teams, offering essential tools to boost your affiliate marketing.
Ideal for individuals & small teams.
- Affiliate Program, Affiliate Discounts.
- Affiliate Dashboards, Affiliate Referral Program.
- Order limit:
- 50 orders per day.
- 15 cents per order after the limit.
$99 /month
Billed MonthlyGold Plan
“Grow with Gold”Elevate your business with the Gold Plan, designed for growing enterprises, including all Silver features plus the ability to host affiliate parties.
Perfect for growing businesses.
- Everything in silver plan,plus.
- Hosting affiliate party feature.
- Order limit:
- 100 orders per day.
- 10 cents per order after the limit.
$199 /month
Billed MonthlyPlatinum Plan
“Go Platinum for Premium Power”Unlock unparalleled value with the Platinum Plan, the best choice for handling large inventories, includes everything from the Silver and Gold plans, plus a generous order limit and much more premium features.
Best value for large inventories.
- Everything in gold plan, plus.
- Order limit:
- 200 orders per day.
- 5 cents per order after the limit.